In this article, we will continue our series of posts on real-life SLA 3D printing cases. They cover all steps of the 3D printing process until the final result is achieved. This article is also dedicated to new users as well as experienced ones. This time, we will introduce you to the development of one very promising piece of technology called ViLim Ball.
ViLim Ball is a therapeutic device that reduces symptoms of essential tremors, Parkinson’s disease, and rheumatoid arthritis. It helps to reduce hand tremors by at least 20 % for most of the patients. Furthermore, ViLim Ball reduces morning stiffness caused by Rheumatoid arthritis (RA). According to the pre-clinical trials, 9 of 10 reported lower stiffness after 10 minutes of therapy.
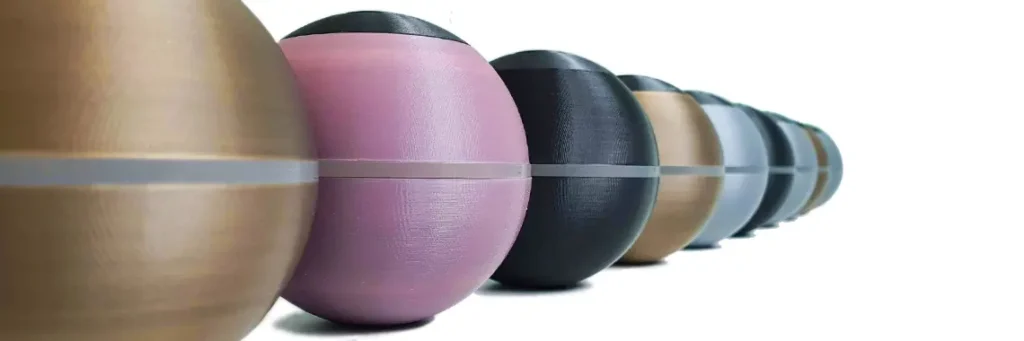
ViLim Ball in action
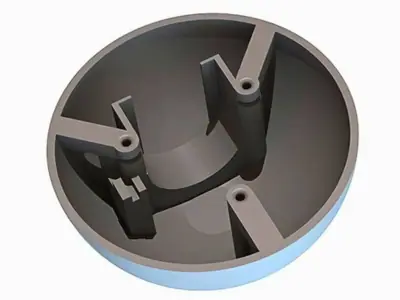
3D printed housing
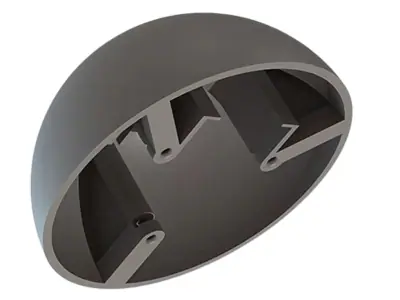
One of the most important parts of this device is its housing. As the name states, it is a ball or a sphere. The creators of the device tried FDM 3D printing to manufacture these devices. However, due to uneven surface and visible layer lines, they decided to get the housing 3D printed with an LCD 3D printer. Both methods will then be compared, and the quality and usability of the product will be evaluated.
The patient will be physically interacting with the ViLim Ball, so there are quite a few requirements to fulfill. We accepted this challenge and decided to help develop the ViLim Ball prototype. So we 3D printed its housing.
We chose to describe the 3D printing process of the lower section of this housing as it is more challenging and interesting than the upper one, which consists of several bosses for screws.
Analysis
The final part had to meet some critical parameters. Users of ViLim Ball will interact with the external surface of the device. Therefore, final surface of the 3D printed housing has to be as smooth as possible, there should be no visible layer lines or support marks.

The part also has some critical functional features. Its inside consists of bosses and holders for electronic components. These must be as precise as possible, otherwise it will be impossible to install required components. However, inner surface quality is not particularly important, so marks of supports and other imperfections are acceptable here.
Dimensional stability also plays a significant role. Since we have two sides of the sphere, they must match precisely when joined together. Warping and any other kind of deformations are unacceptable.
Proper material choice was essential. This device will likely face impact damage, natural wear, ambient UV light, humidity, etc. For these conditions, we had to make custom high-toughness and strength resin. As the final 3D printed housing will be coated, color was not an issue in this case.
Orientation
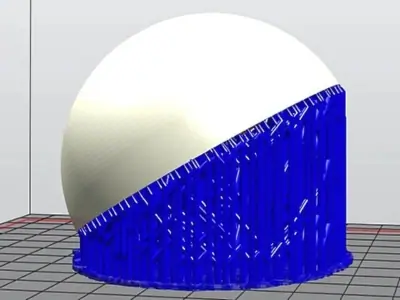
In the past, we learned that spheres are pretty tricky to print. Firstly, one must preserve even and smooth outer surface, therefore, this part must be oriented in such a way that supports would touch only the inner part of the sphere. Secondly, the inner section must be produced as precisely as possible; otherwise, installation of electronic components will be impossible, or even the final performance can be jeopardized. Finally, we expect to see a lot of supports here, so we must be able to remove them properly and not damage functional features.
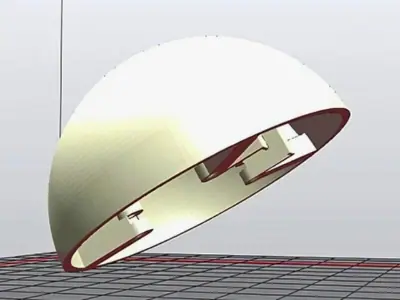
We do not have any flat planes on this object for its placement on the build plate while fulfilling all requirements. Therefore, we will have to position it at an angle. We have chosen to orient this half-sphere at a 30º degree angle. A steeper angle might also work, but that would increase height and prolong printing time. We cannot choose a too steep angle, as supports on the outer surface must be avoided at any cost. Finally, with this orientation, no sudden changes in cross-sectional areas within layers could cause damage.
When it comes to minimizing supports with proper orientation, we realized that there is no specific orientation that will help to reduce them substantially. So, we have chosen to keep this 30º degree orientation as our primary choice.
Supports
Supporting this half-sphere requires careful planning and a lot of consideration to achieve the best result. Honestly, it may also require more than one attempt to produce flawless 3D printed housing.
Base of supports
Previously chosen 30º degree angle orientation also makes our life with supports a bit easier as most of the supports will start from the base plane, which typically results in more rigid and more reliable supports. Supports that start from the object instead of the base plane will fail more frequently, especially if the overhang it supports has quite a large cross-sectional area. In these cases, small bottom-tips of supports that hold it in place fail, and the entire overhang can be damaged.

Supports for 3D printing flat edges
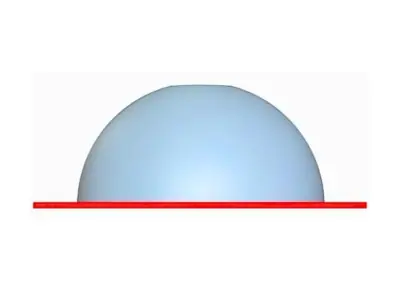
In our experience, the most challenging part with spheres is to print the outer edge that would lay flat on the surface after 3D printing. Any minor warps or inconsistent support patterns typically lead to severe misalignments.
We started with automatic support generation at the highest density. We never entirely rely on automatic generation algorithms. After the software placed the supports, manual adjustments were made. We started with outer edge supports. Tips of all supports within the object ranged from 0.4 to 0.5 mm.
Each blue dot represents a support. We took these images after manual adjustment of the supports.


As you can see, the density of supports around the edge is high. We are doing that to sustain geometry and obtain an edge that would lay flat on the surface. Moreover, the high density of supports will help us avoid undesired visible marks and lines on the outer surface. This usually happens when the density on edges is too low, which results in higher stresses on previously cured layers and their connections during cured layer separations from FEP or PDMS. More supports will help to distribute that stress more evenly.
Supporting inner features
Based on requirements, we had to preserve inner functional features precisely. These features will be used to join the second part of the sphere and install electronic components.

We had to make careful considerations here. A lot of overhangs are present on this functional side of the sphere. Each tip (i.e., starting point) of the overhang needed at least two or three supports.
Flat walls of inner features had to be preserved as well. You can see that we used additional supports to support walls of concave mounting brackets, gussets of bosses, and walls of all remaining features.
Last but not least, we carefully supported the inner convex to sustain proper geometries during 3D printing when stresses arise during cured layers’ separation from the bottom of the resin tray.
Below, you can see fully supported housing ready to get 3D printed.
Hollowing
Hollowing is an essential aspect of SLA/DLP 3D printing to get good results, but it was not mandatory for this part. No thick sections within this object pose risks of severe shrinkage or even cracks.
Attachment layer / Raft
We have added an attachment layer for this part based on our recommendation covered in this previous article. Supports that were used have really thick and even base. Due to this reason, if there were no attachment layers for this part, separation forces from the FEP of the bottom layers would put massive stress on the first layer attached to the printer’s build plate. The likelihood of the 3D printed object falling from the build plate would be high. The attachment layer will help to increase adhesion forces between the base of the object and the build plate.

3D Printing
We 3D printed this housing on an Anycubic Photon LCD/LED 3D printer. Layer height was set to 50μm. The exposure time for a single normal layer was 6 seconds. We cured base layers for 120 seconds.
Although we used an Anycubic Photon 3D printer, this housing can be easily 3D printed on any SLA or DLP 3D printer like Wanhao D7, Phrozen Shuffle, Prusa SL1, Peopoly Moai etc., etc. You just might have to select the correct layer exposure times and other parameters.
Post-processing
There are no special post-processing procedures for this 3D printed housing. After 3D printing, we removed it from the build plate. It was cleaned with IPA: we left it submerged for 10 minutes and then swirled around a bit.
In this case, it was good to leave supports while post-curing in the UV oven to prevent warpage, as supports would help preserve the object’s structural integrity. We post-cured in a UV oven (50 W of 395 nm LEDs) for ~2 hours.
After post-curing, we removed supports. As many of them were pretty thick, we delicately removed them with a pair of pliers. The support removal process had to be done carefully so as not to damage inner features.
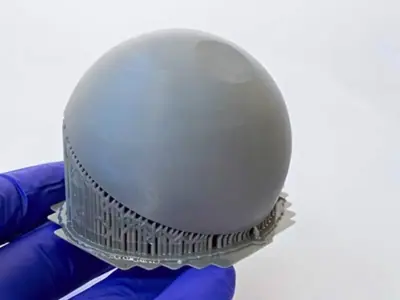
Final results of 3D printed ViLim Ball housing
Below, you can see our fully finished 3D-printed housing.


We also would like to emphasize that there are probably more correct ways to print this object: one may choose different support strategies or orientations. Each of us might have unique experiences and personal preferences. So, if you wish to share your insights, drop a comment below; we will be happy to discuss that as we are learners as well.
Related Posts:
- 3D Design Parts SLA 3D Printing – Liked this housing? This shows you how to design your own parts.
- 3D Printed Cookie Cutters – Want another fun project? This helps you print safely.
- Debunking Common Safety Myths in 3D Printing – Not sure about resin safety? This clears up the confusion.
- Resin Mechanical Properties – Wondering what resin would be the best for your project? This explains it.
- Resin 3D Printing Troubleshooting: A Comprehensive Guide – Prototype prints failing? This sorts it out quick.
Inspired by this housing? Stop by our shop for resins that’ll help you print better!
