
In this article, we will quickly examine one of the underestimated factors of 3D printing – mixing the resin bottle. This article was written for beginners but might also be interesting for advanced users. So let’s dive in.
Shaking and mixing 3D printing resin is a crucial step of resin 3D printing. Especially when using colored resins. We will explain why vigorous resin shaking is mandatory for decent and sustainable printing quality.
Why do 3D printing resins settle?
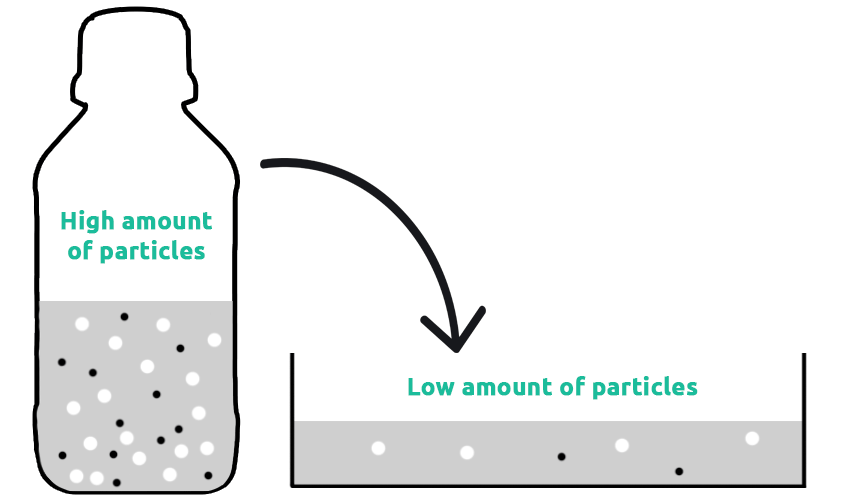
Before moving deeper into the importance of resin mixing, let’s get familiar with the origins of the settling effect. Technically speaking, settling is the process by which heavier particles settle on the bottom of a resin and form sediment. Particles in the resin that experience a force due to gravity tend to move in a uniform manner in the direction exerted by that force. This means that the particles tend to fall to the bottom of the bottle, VAT, or any other container, in which we keep the resin.
Not all 3D printing resins contain particles that will settle. For example, mixing is not that critical for clear resins. Also, translucent resins that use dyes instead of pigments usually do not suffer from settling.
Not every resin containing some sort of particles will eventually settle. There is a number of factors that can determine settling speed. However, there is no need to talk about and evaluate all of them here. Let’s focus on the most common settling behavior that one can find in the most popular opaque 3D printing resins for now.
What kind of particles tend to settle in 3D printing resins?
Nobody knows what is inside each resin, but we all can make informed decisions and rely on our experience. 3D printing resins often contain various additives that can bring desired features: improve mechanical properties, help control the depth of light penetration, provide desired color, etc. These last mentioned particles, i.e., pigments, are the most common type of particles that tend to settle in 3D printing resins. The density of these pigment particles is usually 3-4 times higher than the density of liquid material itself. This density difference is the major cause of settling phenomena in 3D printing resins.
The most popular grey color is usually the most problematic one. That is because to make grey resin, we must use white pigment. Yes, white color mixed with black is what makes grey 3D printing resins. Metal oxides that are used to make resin white have high density, which, as described above, causes a settling effect.
Various ceramic additives in specialty resins are even heavier and thus suffer from settling even more.
What does settling look like?
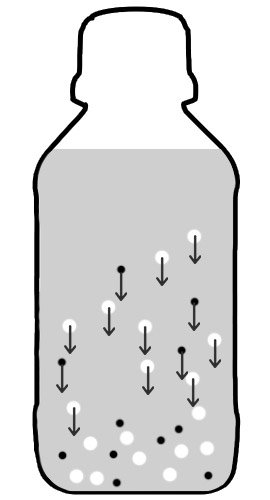
Settling can be different. Pigments that end up on the bottom of the resin container tend to form a very thin film. It is thin mainly due to the fact that the amounts of pigments added to 3D printing resins are relatively low.
However, settling can be very severe if 3D printing resin contains a significant amount of additive or filler. That is the case with various ceramic resins that contain ceramic additives. They can form very thick sediment, which is extremely hard to move and stir.
Consequences of poor resin mixing
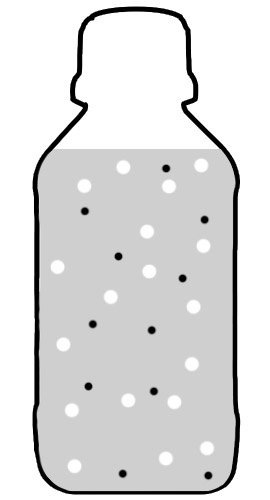
Let’s start with the initial conditions of your 3D printing resin. You have a well mixed resin bottle that you received from a supplier. And let’s assume all pigments and additives are uniform in liquid.
However, as time passes, some particles will start settling down on the bottom.
When you take such a bottle of 3D printing resin with sediment on the bottom, shaking is mandatory to mix it well. In rare cases, some particles will settle down so severely, making quite a thick layer on the bottom. Sometimes, even mechanical mixing with tools might be needed.
In these extreme settling cases, there is one hidden hazard. You will ruin your material after you pour such poorly mixed 3D printing resin into a 3D printer. 3D printing resin in the VAT now has an insufficient amount of components as some particles are still left in the bottle. Meanwhile, your remaining resin in the bottle has a surplus of particles. Thus, the next time when you mix that remainder in the bottle, you will have an unbalanced system with an excess of some components like pigments or additives. This can cause problems with printing speed (it might slow down), loss of details, worse adherence of prints to build plate, non-uniform properties, and more.
3D printing resins vary, and so do settling properties
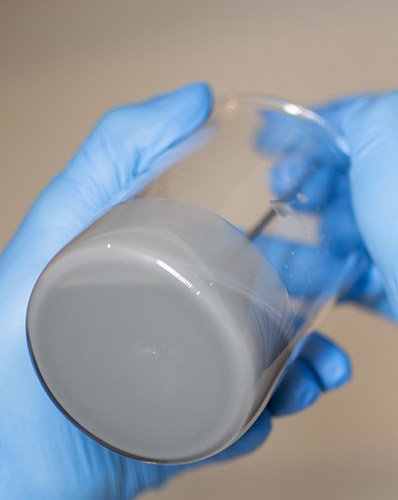
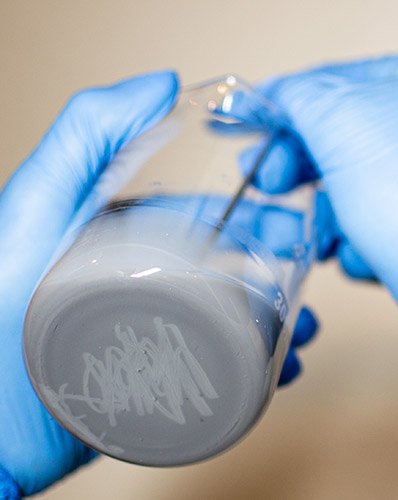
Good 3D printing resins tend to have a balanced system with minimized or eliminated settling effects. To illustrate that, take a look at a couple of examples of several 3D printing resins after staying in the glass beaker for a few days below.
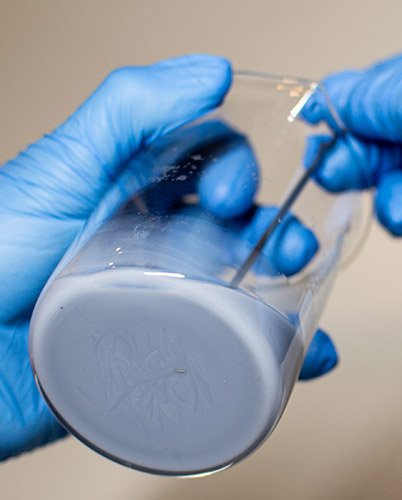
The problem here is that when buying, you never know how good the resin is regarding settling. If you are deep into 3D printing and have really high standards for your prints, test that yourself. Grab a glass beaker, pour some resin, and leave it for a day or two. Check the bottom of the beaker for residue periodically, and judge how long it takes to settle. This will help you to know how well to mix it before using it. Also, you will know how long your 3D printing sessions can last without suffering from settling.
Some 3D printing materials that are available have a very good balance of viscosity and pigment stability. That almost eliminates the settling effect. Therefore, these 3D printing resins require just a gentle stir or shake, and you are ready to go. At AmeraLabs, we have our own technology that helps to eliminate and reduce these negative effects of settling as best as possible. This ensures consistent print quality. However, if you have a chance, always test product properties yourself and be cautious about what the internet says.
Quick hack on how to improve resin mixing
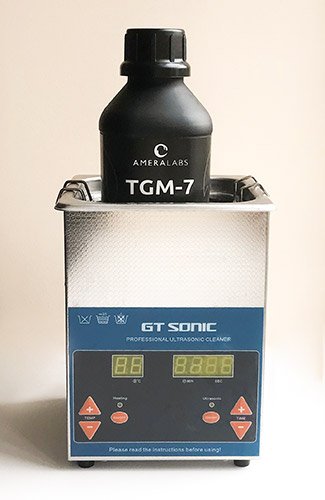
If you have an ultrasonic cleaner, you can use it not only for cleaning your prints but also for mixing the resin! So grab and place the 3D printing resin bottle into an ultrasonic cleaner filled with water. Turn it on! Let it stay there for 10-30 minutes. If you can, turn on the heating (30-35 °C is good enough). We also advise taking the bottle out and shaking the resin periodically while it is in an ultrasonic cleaner.
Related Posts:
- Resin Mechanical Properties – What’s in the bottle matters!
- Uncover Resin Safety Myths in 3D Printing – Print safely & with confidence!
- AMD-3 Resin Printing Guide – Using AMD-3? Tips & Tricks ahead!
- Resin 3D Printing Troubleshooting: A Comprehensive Guide – Noticing print failures? This fixes them.
- SLA 3D Resin Printing Material Choosing Guide – Picking a resin? This guide ifs for you.
Mixing woes? Check our shop for resins that’ll make it simpler!

