
Layer Heights for Miniatures: The Quest for Perfection
Struggling to pick the best layer height for miniatures? I’ve wrestled with balancing crisp details and long print times. I’m Aivaras Sendžikas, AmeraLabs’ 3D printing specialist and a physicist who thrives on challenges – whether scaling cliffs or tweaking resin settings. My drive to push limits, from designing climbing gear to crafting massive minis, fueled this experiment. It started with a chat with my colleague Vytautas about Archvillain Games minis for his gaming collection. We wanted the ideal layer height for miniatures to deliver sharp details and smooth surfaces without endless waits. That sparked a deep dive into resin printing to uncover the best settings for 3D printing miniatures, like mapping a new route up a rock face.
I used my Elegoo Mars 4 DLP with AmeraLabs TGM-7 resin, testing layer heights of 100µm, 80µm, 50µm, 20µm, and 10µm on one build plate for consistency. My models were the Flamehorn Wyrmling (Dragon Trappers Lodge), the Maznar Column (The Printing Goes Ever On), and a community bridge test, sadly no longer on Thingiverse. Thanks to those creators for the files! With a tinkerer’s curiosity, I examined results under a microscope to find the perfect layer height for miniatures and boost your miniature print quality.
New to resin printing? Check our guide Choosing the Best 3D Resin Printer for Beginners.
What Is Layer Height for Miniatures? Your Key to Stunning Prints
Wondering how to choose layer height for miniatures? It’s the thickness of each resin layer your printer cures, measured in microns (µm) – think stacking thin sheets to form a model. Smaller layers (10µm-20µm) create smooth, detailed 3D printing miniatures, perfect for fine features like armor or scales. But they’re slow, like painting a model with precision. Thicker layers (80µm-100µm) are faster but show lines, especially on flat surfaces like terrain or vehicle bodies. Finding the right layer height for miniatures blends art and science, akin to strategizing a gaming battlefield.
Why does this matter? Thin layers make minis pop, ideal for tabletop games where details catch eyes. Flat surfaces need smoothness to avoid roughness, saving you sanding time. For painted minis, 50µm often hides faint lines with primer, but the best layer height for miniatures depends on your goals – detail lovers might choose 20µm, speed fans 80µm. Supports, resin, and settings also shape miniature print quality. I tested how layer height for miniatures affects details, smoothness, and strength to guide your resin printing journey.
I skipped anti-aliasing to keep details sharp, ensuring this test clearly shows how layer height for miniatures impacts 3D printing miniatures.
The Experiment: Testing Layer Height for Miniatures
To find the best layer height for 3D printing miniatures, I planned my experiment with precision, using my Elegoo Mars 4 DLP and TGM-7 resin. All models were printed on one build plate to eliminate variables. I tested layer heights of 100µm, 80µm, 50µm, 20µm, and 10µm, analyzing:
- Flamehorn Wyrmling: A 28mm scale mini with dragon scales, claws, and wings to test fine details.
- Maznar Column: Shrunk to 20% in Chitubox, printed upright without supports to mimic flat, textured surfaces (Miniature Scale Guide).
- Horizontal Bridge Test: A community model with 18 bridges (1mm-18mm) to check bending on overhangs.

The Wyrmling, the tallest model, set the print time pace. I used safe settings to avoid failures, then inspected results with a microscope for layer lines, detail clarity, and strength. Printing together saved time and ensured fair comparisons, revealing the optimal layer height for miniatures, terrain, and overhangs.
One plate kept conditions identical, letting me see how 100µm stacked up against 10µm – a resin printing mission to elevate miniature print quality.
Insight: A single build plate for all prints in chosen layer height made comparing layer height for miniatures easy, ensuring consistent results.
Print Quality: Details That Shine, Surfaces That Work
What did each layer height for miniatures deliver? I dove into resin printing results, examining the Wyrmling and its base for intricate details and the Maznar Column for flat surfaces, using a microscope to spot nuances like a battlefield scout. The results showed how layer height for miniatures shapes miniature print quality across different model types.
Flamehorn Wyrmling: Bringing Mini Details to Life
This 28mm dragon tested miniature print quality with scales, claws, and wings. Microscope images of its body and base revealed clear differences across layer heights.
- 100µm: Harsh layer lines made scales blocky and claws blunt. The base’s textured pattern blurred, with rectangular details faded – fine for terrain but not standout 3D printing miniatures.


- 80µm: Scales showed shape, but lines lingered on wings and curves. Claws sharpened slightly, and the base’s pattern clarified, though stepping persisted. Primer helps, but it’s not the best layer height for miniatures like heroes.


- 50µm: A hobbyist favorite! Scales had crisp edges, claws were defined, and wings flowed smoothly. The base’s pattern popped with clear details; faint lines vanished with primer. This layer height for miniatures balances detail and speed for painted minis.


- 20µm: Razor-sharp scales, claws, and wings with minimal lines. The base’s pattern was smooth and precise, ideal for unpainted display pieces where textures shine.


- 10µm: Ultra-smooth, with lifelike scales and a flawless base pattern. The edge over 20µm was very subtle, invisible post-paint, perfect for unpainted minis.
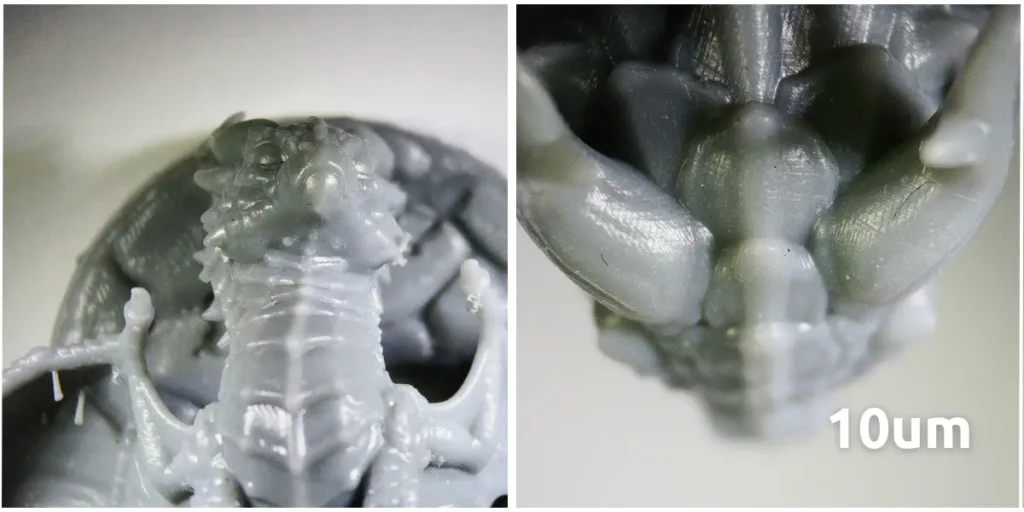

For painted gaming needs, 50µm stood out – details popped, and primer hid flaws, rivaling thinner layers faster. For unpainted minis, 20µm or 10µm reached display quality, proving your goals dictate the best layer height for miniatures. Thicker layers left rough steps, like a rushed prop, while 50µm excelled for tabletop stars.
Tip: Use 50µm for painted minis; save 20µm or 10µm for unpainted heroes needing top miniature print quality.
Maznar Column: Mastering Flat Surfaces
This model tested smoothness on flat, textured surfaces like terrain or vehicle bodies, with a face-like design. Microscope images of its features told the tale across layer heights.
- 100µm: Thick layer lines made the face blocky, creating visible steps on eye sockets and ridges. It needed heavy sanding for paint prep – not ideal for clean resin printing.

- 80µm: Lines softened, and contours emerged, but stepping showed around the nose and eyes. A quick prime or sand could help.
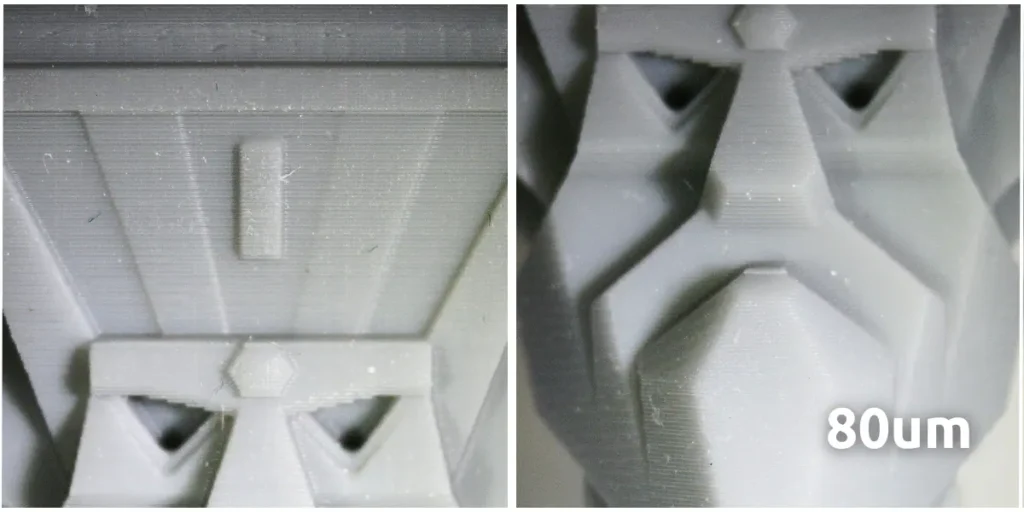
- 50µm: Smooth and paint-ready, with sharp eye sockets and ridges. Faint lines disappeared with one primer coat, making this layer height for miniatures great for terrain with minimal work.

- 20µm: Nearly flawless, with crisp, seamless textures. Perfect for unpainted minis, though often overkill for painted pieces.

- 10µm: Silky and sculpted, with pinpoint detail. The edge over 20µm was minor after paint, best for display models (Who would display their pile of shame, though?).

The images show the Column’s rough face at 100µm becoming sharp and clean by 50µm, with 20µm and 10µm nearing perfection. For flat surfaces, 50µm offered a clean finish fast – ideal for speed-driven hobbyists. For ultra-smooth surfaces, 20µm or 10µm excelled. Thicker layers needed sanding, like fixing a broken prop, while thinner ones were premium but often unnecessary for painted models. The microscope confirmed 50µm’s lines were nearly invisible, perfect for terrain or vehicles.
Tip: Try 50µm with AMD-3 for flat surfaces; thicker layers need sanding for better resin printing results.
See our 3D Printing Miniatures Guide for more tips.
Print Speed: Building Armies Fast
Gaming armies need dozens of minis quickly, so print speed is crucial when picking a layer height for miniatures. I timed each setting to balance speed and miniature print quality:
- 100µm: 58 minutes.
- 80µm: 1 hour 17 minutes.
- 50µm: 2 hours 18 minutes.
- 20µm: 3 hours 52 minutes.
- 10µm: 7 hours 27 minutes.
Thinner layers mean more layers – a 10mm model takes 1,000 layers at 10µm versus 100 at 100µm. Each layer needs hardening (1-3 seconds), pausing (1-3 seconds), and platform movement, adding up with safe settings. For ~20mm sized minis, 50µm delivers squads in 2 hours 18 minutes, while 10µm suits unique characters. Speed fans might prefer thicker layers, detail lovers thinner – it’s your call. 50µm gave sharp Wyrmling details, ideal for troops, leaving 20µm or 10µm for leaders.
Tip: Use 50µm for units; save 20µm or 10µm for characters needing top miniature print quality.
Bridge Sagging: Thin Layers and Strength
To test how layer height for miniatures affects strength, I used a bridge test with 18 spans (1mm-18mm), mimicking overhangs or weapon tips. The results, checked under a microscope, showed clear limits with TGM-7 resin:
- 100µm: Failures were visible to the naked eye from the 7mm bridge upward, with noticeable sagging on longer spans.

- 80µm: Failures started at the 6mm bridge; smaller spans printed fine without obvious issues.
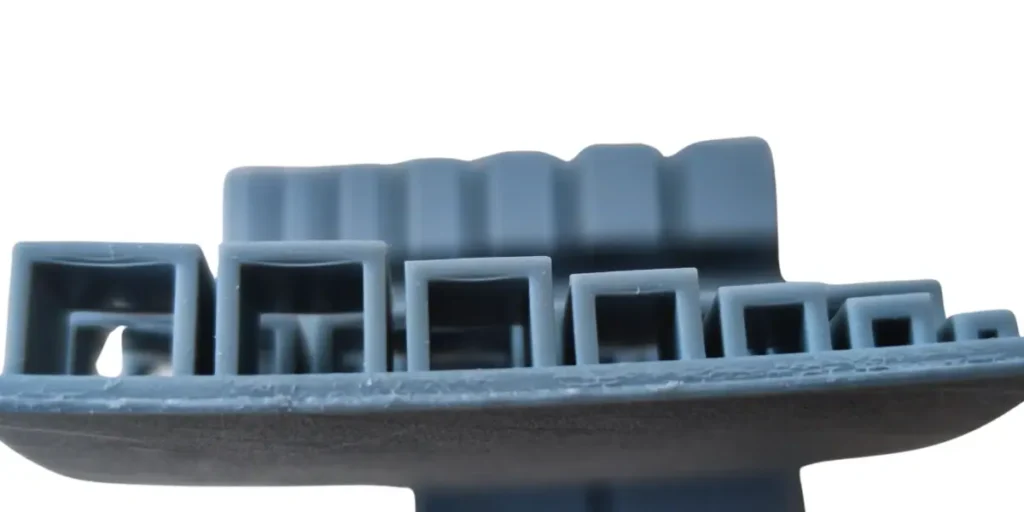
- 50µm: The 4mm bridge was the longest that printed without easily noticeable sagging; beyond that, layers drooped.

- 20µm: The 3mm bridge marked the limit before visible sagging appeared.

- 10µm: All bridges failed, with even the 1mm span showing slight sagging, though it was likely printable with careful setup.
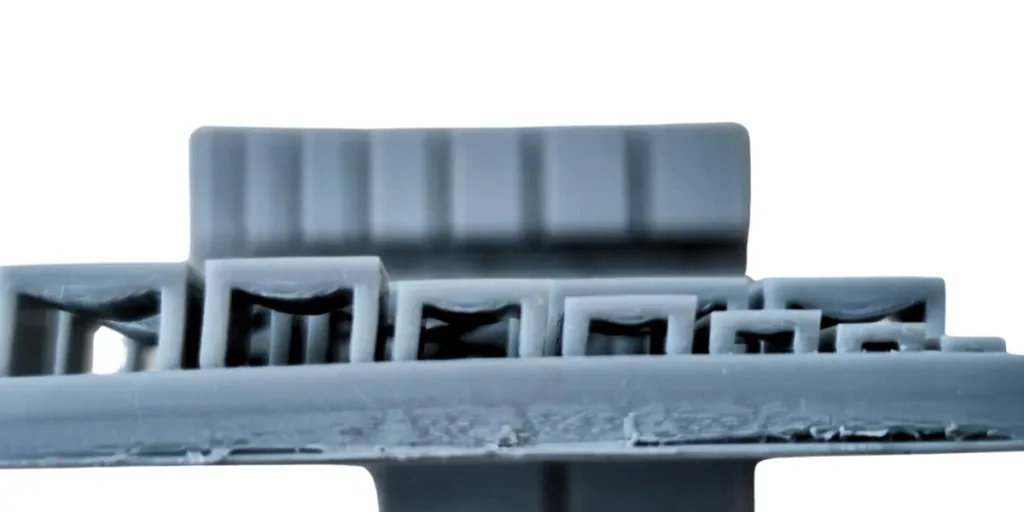
These results highlight a key trade-off: thinner layers struggled more with sagging, especially without supports, due to TGM-7’s flexibility, which suits gaming minis but weakens unsupported spans. Thicker layers like 100µm and 80µm handled longer bridges better but compromised with visible layer lines, as seen in the Wyrmling and Maznar Column. For minis with overhangs, extra supports are essential, especially at 20µm or 10µm, where fan supports can prevent sagging on delicate parts like capes or weapon tips. Brittle resins might fare better in bridge tests, but for playable minis, TGM-7’s flexibility demands more support to maintain strength.
Try This: Use fan supports for 20µm or 10µm to avoid sagging on spans over 1-3mm; add medium supports for 50µm on 5mm+ bridges.
Tip: Supports are a must for any layer height for miniatures with overhangs; fan (also known as rake) supports shine for thin layers in resin printing.
Smoothing Layer Lines: Fillers and Finishes
Layer lines at 100µm or 80µm can be smoothed beyond sanding. Use fillers like resin with baby powder or UV-curable putty for terrain. Apply thinly to avoid blurring details, curing under UV light. For minis, light priming works – fillers suit larger surfaces.
Tip: Prime minis lightly; use fillers on flat parts for smooth 3D printing miniatures.
Viscous Resin Challenges
At 20µm and 10µm, TGM-7 layers expanded to 30-40µm on bases and bridges due to viscosity, confusing my Elegoo’s settings. The microscope confirmed this, but 50µm avoided issues, making it a reliable layer height for miniatures with TGM-7.
This needs tweaking, not fixing. I’ll explore more later, but thicker layers stayed steady.
Try This: Print a Town Calibration Part to test TGM-7’s limits on your resin 3D printer.
Pairing Resins for Success
For flat surfaces like vehicle bodies, the Maznar Column showed 50µm as a strong layer height for miniatures and terrain, smoothing panels fast. Thicker layers needed sanding, while 20µm was overkill for painted models. Resins mattered:
- TGM-7: Flexible for small parts, tough for games.
- AMD-3: Hard for terrain, smooth and strong.
Pair TGM-7 for details and AMD-3 for flat surfaces for durable 3D printing miniatures.
Tip: Use both at 50µm, or thinner for smoother resin printing.
Your Action Plan: Craft Gaming Armies Your Way
Ready to master layer height for miniatures? The Wyrmling’s body, base, and Maznar Column’s face guide your plan to print armies matching your style – speed or detail. Here’s how, with steps and fixes:
- 100µm-80µm: Best for quick terrain. Done in under 1.5 hours, but the Wyrmling’s blocky scales and mushy base at 100µm, or stepped at 80µm, need heavy priming. The Column’s face was rough at 100µm, better at 80µm but needing work – great for speed. Fixing Issues: If lines linger, use thick primer or slow lift to 50mm/min.
- 50µm: Ideal for most minis and surfaces. At 2 hours 18 minutes, it gave the Wyrmling crisp scales and a sharp base, with the Column’s face paint-ready – perfect for soldiers, vehicles or terrain. Printing in thicker layers skips issues with viscous resins.
- 20µm-10µm: Suits standout characters or display pieces. The Wyrmling’s scales were sharp at 20µm, flawless at 10µm, with a smooth base. The Column’s face was seamless, 10µm smoother. Example: For a leader use 20µm with TGM-7, add 20% more supports (0.3mm tips). Fixing Issues: If sagging, add fan supports for 1mm+ spans or use 50µm for speed.
Steps to Start:
- Try 50µm: Grab a MyMiniFactory file like a 28mm soldier. Use TGM-7 at 50µm, calibrate with AmeraLabs Town for each layer height. Compare to different layer heights – 50µm layers print faster than 20µm.
- Strengthen Thin Layers: For 20µm or 10µm on heroes, add 20% more supports (0.3mm tips). Test on a small model first.
- Test Resin for Unsupported Bridges: Print a Town Calibration Part with TGM-7. Check the bridge test on Town Calibration Part and increase support density if required.
- Mix Resins: Use TGM-7 for details, AMD-3 for terrain at 50µm – or thinner for smoothness. For vehicles, print bodies with AMD-3, details with TGM-7, then glue.
Fixing Issues: Sand and use resin glue if parts don’t bond. - Maintain Printer: Thin layers strain over 7+ hours. Check the FEP film after 20 prints; tilt minis 10-15 degrees on big plates.
Extra Tips:
- Software: Use Chitubox or Lychee, 5mm platform lift, 1-2-second rest after retract for TGM-7.
- Resin Care: Keep TGM-7 at 20-25°C, shake well, filter after prints.
- Finishing: For 50µm, two thin primer coats hide lines; one coat for AMD-3 surfaces. Sand 100µm with 400-grit; apply fillers thinly.
- Fixes: If 50µm splits, add 0.5 seconds hardening or slow lift. Reduce hardening for sticky thin layers.
Explore our Scaling Miniature Production Guide.
Insight: This plan builds armies your way, ensuring top miniature print quality with smart resin printing tactics.
Conclusion: Create Epic Gaming Armies
This test, sparked by Vytautas, proves 50µm is a fantastic layer height for miniatures, delivering sharp Wyrmling scales, smooth bases, and detailed Maznar Column surfaces in one third of the time of 10µm – perfect for armies and terrain. Your best layer height for 3D printing miniatures hinges on speed or detail, so experiment! Pair TGM-7 for details and AMD-3 for flat parts to craft minis that dominate. Shop AmeraLabs resins and share with #AmeraLabs3DPrinting – I’d love to see your creations!