
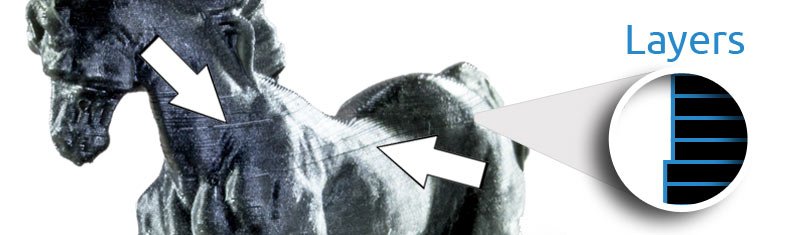
In this post, we are going to discuss an infamous 3d resin printer issue of unwanted visible horizontal layer lines that appear on a 3D printed surface. Although those horizontal lines in resin 3D prints are very annoying and disturbing, it is possible to name the main reasons why they appear that way and how to reduce the likelihood of such formation.
Generally speaking, these lines are caused by the misalignment of one layer with the next single or multiple layers. But why does this misalignment happens in the first place? There are quite a few reasons for that. So, let’s analyze them individually, together with potential solutions for minimizing each effect.
Please note that we are not talking about natural layer lines that may be visible throughout the whole surface of a 3D printed part. This article is about conspicuous and usually random misalignment between layers. Anti-aliasing and similar techniques, which are used to smoothen the surface, cannot completely solve these issues and are not covered here.
1. Sudden changes in exposure time from one layer to another can cause lines in 3D prints.
When it comes to the occurrence of surface lines on resin prints, one prominent factor is the fluctuation in exposure levels across the print. Familiarity with the notion of varied exposure times for distinct sections of the print, such as the attachment layer, foundation, and body of supports, is widespread among enthusiasts. These distinctions play a pivotal role in ensuring a successful printing outcome. Nevertheless, contemporary slicers like Voxeldance Tango and Asiga Composer offer the flexibility of setting different exposure zones for the entire model. Introducing alterations to exposure times for model layers typically leads to the emergence of noticeable surface lines. Therefore, it is advisable to refrain from making exposure adjustments for model layers unless it becomes absolutely necessary.
2. Changes in lifting speeds can cause horizontal lines in 3D prints.
The same applies to lifting speeds as to sudden changes to exposure times. SLA 3D printing does not tolerate unexpected changes to printing parameters at any time during the process. Consequently, when base layers and support layers have been completed and the printing process has stepped into the layers of the model, we do not recommend changing the lifting speeds. Changes in lift velocity will result in different mechanical stresses that subsequent layers must withstand. Therefore, that may cause stretches and deformations that are different from previous layers.
3. Unexpected stops and pauses in the print process.
When addressing the issue of visible surface lines on resin prints, it’s essential to consider the impact of pausing a 3D print, which significantly heightens the likelihood of horizontal lines and marks becoming noticeable, particularly resin printer layer lines. The primary culprit behind this phenomenon is the shrinkage exhibited by the 3D resin being used. While certain 3D printing materials may possess higher shrinkage properties than others, all are susceptible to this challenge to varying degrees. Halting the 3D printing process disrupts the natural shrinkage of the completed portion of the model, potentially exacerbating resin printer layer lines. Consequently, it may shrink excessively, causing misalignment with subsequent layers of the model. Thus, unless absolutely necessary, it’s advisable not to interrupt the flow of the resin 3D printing process.
4. Changes in the model structure can cause horizontal lines in 3D prints.
Another factor contributing to the appearance of visible horizontal lines on resin prints is sudden changes in the model’s structure. Instances such as transitioning from a hollow to a solid part or from a small to a large cross-sectional area often result in the formation of lines. Such abrupt transitions among layers lead to significant volumetric changes, impacting the distribution of 3D resin within each layer. The volume of resin in each layer plays a crucial role in its shrinkage upon curing, with uneven material distribution among layers causing variable shrinkage – a primary culprit behind visible surface marks and lines.
To mitigate this issue, it’s crucial to minimize the occurrence of such transitions. This entails reducing the frequency of shifts from small to large cross-sectional areas or from hollow to solid sections. Properly orienting parts during the 3D printing process ensures that cross-sectional area changes occur as gradually as possible, thereby minimizing the likelihood of visible surface lines and marks.
5. Unstable position and foundation of the part.
If the part that you are printing does not have a solid foundation, it can be easily shifted during the printing. Even micro changes in the position of the part will result in visible horizontal lines in the 3D printed surface. Such position changes will typically occur because of the following reasons.
- Lack of supports. Insufficiently supported areas will shift way easier and cause misalignment among layers.
- Insufficient exposures. This especially applies to base and support layers because they must withstand the highest number of separation cycles from FEP or PDMS (for bottom-up resin printers).
- Material properties. 3D printing resin may be too soft and flexible.
A robust and sturdy foundation with proper support density will help keep your part stable. As a result, it will greatly reduce the negative impact of mechanical forces of layer separation from FEP film or PDMS. You should also pay thorough attention to exposure times for base and support layers, i.e., overexposing them can greatly improve their rigidity. Lastly, you should also consider if the material that you are using is suitable for your print. Just changing your 3D printing resin to a bit harder or with lower shrinkage properties can vastly reduce the chances of deformation.
6. Resin in the tray is disturbed during exposure & horizontal lines in 3D prints.
When striving to prevent surface marks and horizontal lines, maintaining an undisturbed resin in the tray emerges as another critical consideration, particularly for minimizing resin printer layer lines. Any disruption to the resin can compromise its established homogeneity at a specific point in time. Simply mixing or adding more resin alters its consistency, potentially affecting pigment homogeneity if additional resin is poured into the tray. Variations in pigment concentration can disrupt light-blocking properties, leading to an inconsistent layer structure.
Additionally, the use of a small heater inside the resin printer, blowing directly at the print, is a common culprit behind horizontal lines in resin 3D prints. In certain printers, manufacturers position the heater beneath the printer cover, sometimes orienting it toward the resin vat, which can pose challenges during printing. To address this issue, it’s advisable to either disable the fan during printing or devise a redirection mechanism to ensure airflow is directed away from the printing area, thereby reducing the likelihood of resin printer layer lines.
7. Durability of Z axis.
An unstable and wobbly Z axis can be a major source of various SLA 3D printing imperfections. If you have a wobbly Z axis, this can lead to surface marks that also feature cyclicality. So, if you notice that marks repeat periodically on the surface with equal spaces, that is a true example of a wobbly Z axis. Observe how the Z axis moves and if the wobbling effect is apparent. If yes, try to change your Z axis threaded rod with a new one, for example, ACME trapezoidal thread. Try to install it as straight as possible to prevent a wobbling effect in the future.
Moreover, remember to keep your threaded rod clean and slightly lubricated. Any dust or dirt residue can significantly impact the fluid movement of the Z axis. Without the smooth movement of Z axis, you cannot expect to print a part of the perfect surface.
8. Layer separation from FEP or PDMS.
During the printing, most of the bottom-up style resin printers have to withstand layer separation. Some 3D printers have a somewhat firm bottom of resin tray coated with either PDMS or FEP film. Due to the quite firm bottom of the resin tray, they usually exploit tilting action when separating layers from the bottom of the resin tray. This approach tends to create higher loads for one side of the model (the side actually depends on the tilting design and approach). Because of this, the side of the model with higher loads will tend to shift and deform more than the opposite one and, therefore, might cause asymmetrical visible surface marks. If you want to avoid it, you have to consider these uneven forces and support each side of the model according to the level of forces they withstand.
9. Material settlement (sedimentation).
3D printing resins consist of various components. When you mix them, most of them can stay homogenous, i.e., uniform. However, that is not the case with some specific components.
Pigments are solid particles that do not dissolve in the resin. Due to differences in density, these tend to settle in 3D resin (that is why the label always states, “Shake well before use”). Therefore, if you print very long prints with well pigmented resin, you can experience surface marks and horizontal lines on your 3D prints due to pigment sedimentation.
If you like the resin you use, there is no easy way to avoid this fundamental issue. You can think that mixing during the printing might help, but remember that stirring and disturbing the resin can also increase the chances of surface marks. One option is to use 3D printing resins that incorporate soluble dyes instead of pigments. These do not settle because they dissolve in resin, resulting in a uniform solution. Secondly, you can go for AmeraLabs 3D printing materials that have very carefully selected and balanced systems of pigments. Some of them do not settle for at least 1-2 days.
10. Incorrect printing parameters and general mistakes.
Acknowledging the importance of addressing random variables is crucial in mitigating surface marks and horizontal lines in 3D prints. Often, these imperfections arise from incorrect 3D printing parameters, such as extended exposure times (cure time) per layer and rapid lift speeds post-curing. Accelerated lift speeds amplify delamination forces, jeopardizing surface integrity. To ensure superior results, prioritize conservative printing settings and meticulous calibration procedures before tackling complex 3D projects. Additionally, remember to thoroughly shake your 3D resin bottle to prevent uneven material distribution, which can significantly increase the occurrence of horizontal lines in 3D prints.
FAQ: Addressing Unwanted Horizontal Lines in Resin 3D Printing
Q: What are some additional methods to prevent unwanted horizontal lines in resin 3D prints?
A: Beyond the main strategies discussed, several additional methods can help prevent unwanted horizontal lines. Consider using higher-quality resin with better consistency to reduce layer misalignment. Properly calibrating and maintaining your printer, including ensuring the Z axis is stable and aligned, can also reduce line visibility. Additionally, using a resin filter can help maintain uniformity by removing any particles or sediment that may contribute to surface imperfections.
Q: How can I address issues with layer separation from FEP or PDMS to minimize horizontal lines?
A: To address layer separation issues from FEP or PDMS, ensure that your model is properly supported to distribute forces evenly. Use a resin tray with a well-maintained FEP or PDMS film and ensure it is free from any damage or wear. Regularly clean the resin tray and check for any inconsistencies in the surface. Adjusting the print settings, such as lift speeds and tilt angles, can also help mitigate the impact of layer separation.
Q: Are there any recommended practices for improving the stability of the Z-axis to prevent surface marks?
A: To improve the stability of the Z axis and prevent surface marks, start by inspecting the threaded rod for any wear or misalignment. Replace any damaged parts and ensure the rod is securely mounted. Regularly clean and lubricate the threaded rod to ensure smooth operation. If possible, add stabilizing brackets or supports to enhance the Z axis stability. Perform routine maintenance checks and calibrate the printer to ensure optimal performance.
Q: Can changing the resin’s temperature affect the formation of horizontal lines on prints?
A: Yes, adjusting the resin’s temperature can influence the formation of horizontal lines. Warming the resin can make it more viscous, which may reduce turbulence and improve layer adhesion. However, it’s crucial to keep the resin within the recommended temperature range to avoid potential negative effects on print quality or printer components. Ensure that any temperature adjustments do not exceed the manufacturer’s specifications for the resin.
What’s next?
If you need more help or have found mistakes in this post, email us, and we will respond as soon as possible.
Don’t miss other AmeraLabs articles to find out more about calibration:
- Key things to know before calibrating resin 3D printer
- Impressive calibration part for resin 3D printers together with the guide on how to understand its features
- Attachment Layer in SLA 3D printing: what you need to know
- How to design parts for SLA 3D Printing
- 6 Key Principles of 3D Printing Supports that Work
- How to Make Jewellery with Silicone Mold
Don’t forget to browse our shop as we constantly add new and exciting products!
