Key things to know before calibrating resin 3D printer


In this AmeraLabs post, we will dive into what is resin printer calibration. You will learn the key things you need to know before running your calibration procedure.
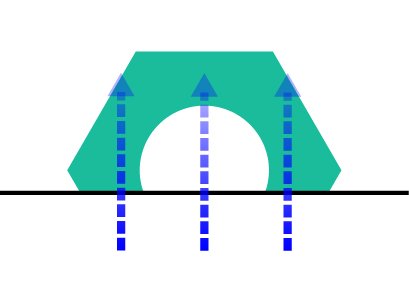
Core settings
The goal of resin 3D printer calibration is to balance these three core settings:

The exposure time of a single layer

XY resolution
(i.e., which is pixel or laser spot size)

Layer height
(Z resolution)
The exposure time of a single layer.
The most important parameter is the exposure time of a single layer. It defines light exposure duration for a single layer of an object that you are trying to print. This term applies to DLP and MSLA (LED/LCD-based) 3D printers. With such equipment entire layer is exposed, whereas SLA printers’ laser “draws” each layer. This “exposure time” notion does not apply directly to laser-based printers. In these printers, you can adjust laser power and laser speed. You can increase 3D resin light exposure with the laser by increasing power or slowing the laser down.
Incorrect exposure is one of the major reasons why resin prints fail. Besides obvious reasons such as loss of intricate details and dimensional accuracy, incorrect exposure settings will result in other problems. Too long exposure settings will typically result in the following issues.
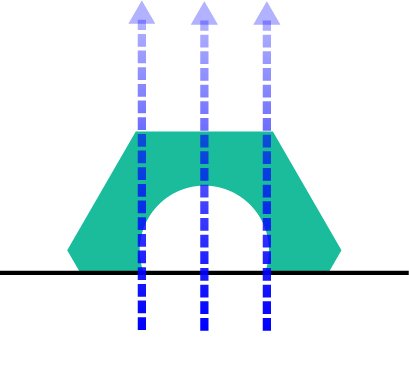
Bleeding of light
When light penetrates and cures material too deeply. It will result in a loss of details and a loss of dimensional accuracy in the Z-axis. Small features of your print will come out bigger than expected.
If you notice such an effect, shorten your exposure (cure time) settings. After printing another resin printer calibration print, evaluate the difference and adjust your settings again, if needed.
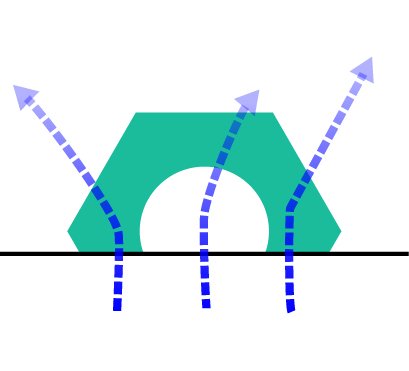
Scattering effect
When light’s straight trajectory deviates from the intended one resulting in polymerization in undesired directions. Usually, that happens due to the lack of light-blocking pigment in 3D printing resin. Too long curing times may magnify this scattering effect. It will also result in a loss of details and dimensional accuracy in the Z and XY axes.
You can start fixing this by reducing your exposure settings and/or adding more light-blocking pigments. In most cases, solving the scattering effect issue is difficult without changing the 3D printing material type.
In regards to too short exposures, you will have the following issues.
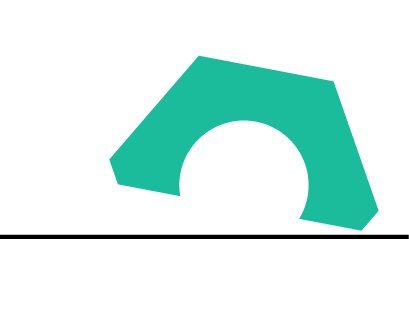
Under-cure effect
It will typically reveal itself as layer delamination in the middle of the part due to poor layer adhesion and will result in part or even full model stuck to the bottom of the resin tray. You can also observe a serious loss of intricate details. They will come out smaller than expected or absent at all.
Try to increase your exposure settings. After reprinting your test print, pay attention to the quality of small features.
Poor adhesion of the model to the build plate
Poor adhesion of the model to the build plate. It can even result in the model falling down and damaging your resin tray. The most typical result is to see a thick layer of 3D printing resin cured on the bottom of the resin tray and nothing on the build plate.
Increase the exposure time of your first layer. Make it around 10 times longer than your normal layer cure time.
It is not possible to characterize the exposure time parameter on its own. Exposure depends on and is a result of the rest of the factors. So let’s overview them one by one and see how they affect exposure time. In the end, we will take a look at other causes that influence it but are not that significant.

Resolution (X and Y axis)
XY resolution is the size of an individual pixel for LCD/LED and DLP systems and the laser spot diameter for SLA laser systems. Generally, XY resolution is fixed for LCD/LED and SLA systems, so you do not have to worry about exposure changes due to XY resolution adjustments. If you own a DLP projector with adjustable resolution, it can significantly affect your exposure times. So, you have to keep that in mind when running your resin printer calibration. When you move your projector up, you decrease your build area, which means that the entire output of the light source (in mW) is concentrated in a smaller area (cm2), therefore, your mW/cm2 increases. Consequently, your 3D resin will get more light energy, which will result in shorter exposure times and faster chemical reactions. The opposite applies when you increase the projector distance from the resin tray. When doing this entire output of light is concentrated in a bigger area, your mW/cm2 decreases, and resin will get less energy per square unit. That will result in longer exposure times and slower chemical reactions.
Layer height (Z resolution)
Layer height determines the thickness of a single layer of an object that you are printing. It is a so-called Z resolution. You can choose from the most common layer heights, which are 30μm and 100μm, but if you need extremely high quality and smooth surface, you can also aim for 20μm. Anything between these numbers is also fine but not very common. You should also remember that the practical difference between 50μm and 20μm with a well mechanically tuned machine is negligible, whereas the difference in 3D printing time is huge.
It is very difficult to come up with some sort of rule for exposure time changes regarding layer changes. The intensity of light passing through a media diminishes exponentially. That being said, the absorption properties of 3D resin and its components determine the relation between exposure duration and layer thickness, which is not linear. However, here at AmeraLabs, we use a rule of thumb that we will share with you. If you go down below 75-100μm layer height and keep XY resolution constant, for a 50 % layer reduction, you should lower exposure by 25%. This rule is a bit subjective, and in some cases, correct exposure can be even shorter, but it is a good starting point.
50% lower layer height = 25% lower exposure
How often should you run the resin printer calibration procedure?
Apart from calibration of the 3D printer right after the purchase, there are quite a few occasions when it is highly recommended to re-run calibration routines.
When changing 3D printing resin
If you change your 3D resin brand, it is also a good idea to re-run calibration procedures. Each brand of 3D resin is very different in terms of reactivity and pigment/dye concentration. With some 3D resin brands, you should repeat resin printer calibration even after opening a new bottle because you rarely know when it was manufactured and if well-established quality assurance procedures were used. At AmeraLabs, each of our materials is run through enormous scientifically-proven testing procedures with various resin 3D printers to sustain identical performance each time.
Every 3–6 months
The light source of the 3D printer is aging. No matter if it is a laser, DLP/UV projector, or LED – its power decays as time goes by. To compensate for that, we recommend to periodically rerun calibration procedures. However, it is difficult to specify the exact frequency, as it depends on how often you print and what type of light source you have. Therefore, if you print for your needs, reviewing your light source condition once in 3 to 6 months is fine. If you see some visible changes in your printing quality (perhaps your light source is decaying faster than expected), you should rerun your calibration procedure. Of course, if you decide to change your light source completely, extensive calibration is mandatory to obtain decent printing results.
What’s next?
Finally, to ease the stress of resin printer calibration, we have created an AmeraLabs Town calibration test print that is available for everybody to download. Most importantly, it is packed with an extensive guide on reading and interpreting its various features.
If you need more help, feel free to drop us an email.
Read other articles:
- The Complete Resin 3D Printing Settings Guide for Beginners
- Why is it so important to shake the resin bottle?
- The Beginner’s Guide to 3D printing with AmeraLabs resins
- True story of why it was so difficult to choose my first 3D resin
- 10 reasons why you get unexpected horizontal lines on your 3D printed parts
- Attachment Layer in SLA 3D printing: what you need to know
Don’t forget to browse our shop, as we constantly add new and exciting products!