
Introduction to Resin 3D Printing Settings
Mastering resin 3D printing settings is crucial for beginners aiming to achieve high-quality prints. Starting can feel overwhelming since there’s so much to learn before your first successful print. Common questions like “Where do I begin?”, “What are the best resin 3D printing settings?”, and “What model should I print first?” often arise. But don’t worry – you’re not alone in this journey!
This guide will walk you through the essential resin 3D printing settings that every beginner should know. By the end, you’ll feel confident about layer heights in miniature resin 3D printing.
Still deciding on your first printer? Check out our detailed guide on choosing the best resin 3D printer for beginners. It will help you pick the right machine to match your goals and budget.
Unfortunately, many online resources about resin 3D printing are scattered and incomplete. Resin printing involves numerous parameters and environmental factors, and focusing on just a few settings is rarely enough to solve common issues. Making adjustments without understanding their impact can feel like a frustrating guessing game.
This guide simplifies resin 3D printing by explaining essential settings using terms from popular slicers like Chitubox, Lychee, Voxeldance Tango, PrusaSlicer, and Z-Suite. You’ll gain a clearer understanding of what you can control, making it easier to troubleshoot and improve your prints.
If you’re setting up a workspace for resin printing – especially for business purposes – don’t miss our Business Resin Printing Setup Guide & Checklist. It provides expert tips for creating a safe and efficient environment.
By mastering these resin 3D printing settings, even beginners can achieve professional-level print quality. Whether you’re just starting or looking to refine your skills, this guide is your ultimate resource for superior results.
The calibration part is your best friend
Whenever you set up a new 3D printer, switch to a new resin, or encounter a failed print with no clear cause, printing a calibration part is essential. Calibration parts are designed to help you fine-tune your settings and troubleshoot issues effectively. Fortunately, there’s a wide selection of free calibration parts available for download.

However, we highly recommend starting with AmeraLabs Town, our proprietary calibration model. This comprehensive test print is specifically designed to help identify optimal exposure settings and evaluate other critical factors. For instance, it can reveal whether your cleaning process is thorough enough. It’s a tiny yet powerful tool for improving print quality.
Here are a few other calibration parts worth exploring:
- Photonsters Validation Matrix – A popular choice for validating exposure times and layer consistency.
- Phrozen Calibration Part – A reliable test model for assessing precision and accuracy.
Including calibration in your workflow saves time and resin by identifying potential issues early. It’s an invaluable step for achieving consistent, high-quality results in resin 3D printing.
Finding perfect resin 3D printing settings
There’s no single set of resin 3D printing settings that works perfectly for every situation. However, you can determine the best settings for your specific model and application through careful calibration and testing.
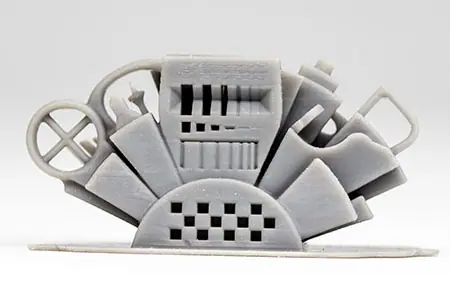
Our AmeraLabs Town calibration model is an excellent tool for uncovering optimal resin 3D printing settings. Often referred to as a “torture test,” this model pushes your printer and resin to their limits. No current 3D printer can replicate this model perfectly, making it a valuable benchmark. It highlights the details your printer and resin can handle while showing which features may fail under specific settings. This insight helps you assess whether the balance of successful and failed details aligns with your intended application.
To demonstrate, we printed AmeraLabs Town using AmeraLabs AMD-3 Grey resin on an Anycubic Photon Mono 4K printer with two different exposure times.

- 1.2s Exposure Time (Left Calibration Print):
- All vertical and horizontal gaps are open.
- Tiny building windows are clear and well-defined.
- Four rows of pins are visible, though the antenna tower appears slightly wobbly.
- The chess pattern is decent but shows slight under-curing, with corners not aligning perfectly.
- 2.2s Exposure Time (Right Calibration Print):
- Smallest vertical and horizontal gaps are closed.
- Windows on the buildings appear smaller than intended.
- Five rows of pins are visible, with a straight antenna tower.
- The chess pattern is flawless, indicating proper curing.
Choosing the Right Settings:
- 1.2s Exposure: Ideal for prints requiring sharp negative details and clear textures, such as intricate surface patterns. However, this setting might not work well for large, heavy models supported by thin structures.
- 2.2s Exposure: Better suited for larger, heavier prints that require robust positive details and strong supports. While some negative details may be lost, this setting ensures stability and durability.
These examples highlight how different settings produce varied results. The “perfect” settings depend entirely on your printer, resin, model complexity, and application needs. By experimenting and calibrating, you’ll identify the optimal balance for achieving your desired results.
Let’s explore how specific resin 3D printing settings influence your outcomes in the next section.
Key 3D printing settings
Layer Thickness
What is Layer Thickness?
Layer thickness, also called layer height in some slicers, refers to the height of a single layer in your 3D print. This is a customizable setting that directly impacts the quality, detail, and speed of your prints.
Thinner layers require shorter exposure times but result in more layers overall, significantly increasing the total print time. Conversely, thicker layers shorten print times but reduce detail and make layer lines more visible.
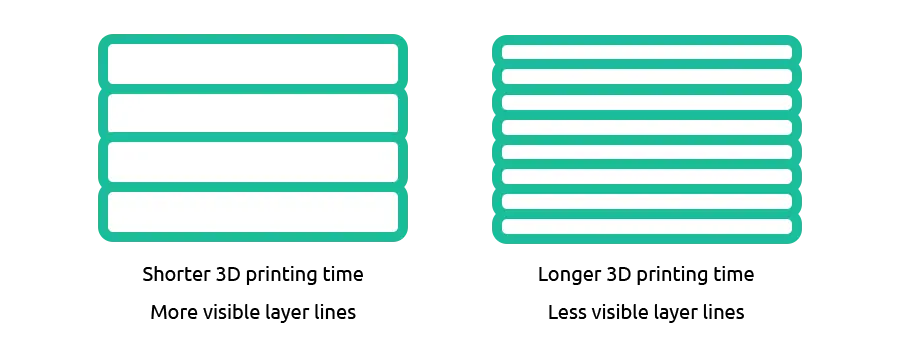
What Layer Thickness Should You Use?
100 μm: A faster option suitable for larger mechanical parts, quick prototypes, and some dental applications. Layer lines are visible, but the faster printing speed makes it a practical choice for less detailed models.
50 μm (0.05 mm): The most commonly used layer thickness, offering a good balance between print quality and speed. Layer lines are not noticeable without close inspection, making this setting ideal for miniatures, dental models, and prototypes.
20–30 μm: This setting is perfect for intricate parts, jewelry, and detailed miniatures. At this layer height, layer lines are almost invisible, but print times increase by 1.5 to 3 times compared to 50 μm.
Examples Using AmeraLabs AMD-3 Grey Resin
10 μm Layers: Comparable to 20 μm in quality but significantly increases print time, often making it impractical.
100 μm Layers: Visible lines but excellent for large models and quick prints.
50 μm Layers: Minimal layer lines, making it a versatile choice for most applications.
20 μm Layers: Nearly invisible layer lines, ideal for jewelry, highly detailed miniatures, and precise dental or mechanical parts.

To sum up, you can use whatever layer thickness you like. If we dig deeper, there are some tricks to get the best results by using layer heights aligned with Z-axis motor steps. But in most cases, you’ll be fine if you stick with 5 μm multiples for layer height. We always recommend experimenting with that to see what gives you the best results. Take into consideration the time it takes to complete the print and the quality you get with different layer heights. Finally, have different settings ready for different layer heights. This way, you will quickly take the best resin settings for the model you want to print.
Resin Manufacturers Tip #1
Most resins are designed to perform well with layer heights between 10–100 μm:
Draft resins work best at 100–200 μm for faster, less detailed prints.
High-resolution resins excel at heights below 50 μm.
Resin formulations account for layer height by adjusting the concentration of light-blocking components. Too much pigment prevents proper curing, causing layers to separate. Too little pigment leads to light bleed, reducing detail accuracy. For optimal results, consult your resin manufacturer for guidance on the best layer height for your resin.
Consider XY Resolution
Layer height isn’t the only factor affecting print quality. The XY resolution of your printer, determined by the pixel size of its LCD screen, DLP projector, or laser spot, also plays a critical role. Typically ranging from 20–90 μm, the XY resolution sets a limit on the level of detail your printer can achieve, regardless of layer height.
Challenges with Thin Layers
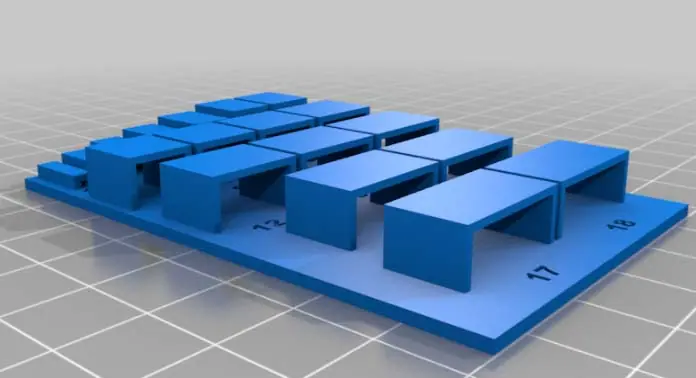
Printing with very thin layers (10–30 μm) can make it harder to print horizontal “bridges.” To test your printer’s capabilities, try printing a bridge test like the one we found on Thingiverse.
Conclusion
Choosing the right layer thickness involves balancing speed, detail, and the limitations of your printer and resin. Experimentation and understanding your printer’s capabilities are key to achieving optimal results.
Normal Layer Exposure Time
What is Exposure?
Exposure time, also referred to as layer exposure time, normal exposure time, or layer cure time in slicers, determines how long the 3D printer exposes the resin to UV light to cure a single layer. This parameter is typically measured in seconds or milliseconds and is one of the most important settings for ensuring the quality, sharpness, and overall success of your 3D print.
Why is Exposure Time Crucial?
Getting the exposure time right is essential because it directly impacts:
- Print Quality: Correct exposure ensures well-defined details and smooth surfaces.
- Print Success: Proper curing minimizes failed prints caused by under- or over-exposure.
- Sharpness: Accurate exposure times prevent light bleed, preserving fine features and intricate designs.
By adjusting this setting to suit your resin and printer, you can significantly enhance your printing results and avoid common issues like excessive curing or incomplete layer adhesion.
Let’s dive deeper into how exposure time interacts with other key settings and how to fine-tune it for the best results.

If your exposure time is too short, layers won’t properly stick to each other. The connections between layers will be weak, increasing the likelihood of breakage during the printing process. This issue often leads to failed supports, incomplete structures, or layers separating mid-print, causing the entire print to fail.
This phenomenon is known as under-exposure. It occurs when the UV light doesn’t cure the resin sufficiently to create strong bonds between layers. Properly adjusting your exposure time is crucial to avoid under-exposure and ensure stable, successful prints.

When the exposure time is slightly too short, the effects might not immediately cause a failed print but can still impact the accuracy of your model. Positive features, such as raised details or solid elements, will appear thinner and smaller than intended. Conversely, negative features like holes, gaps, or recesses will be larger than expected.
These subtle distortions are also a result of under-exposure. While the layers may adhere, the incomplete curing leads to inaccuracies in your model’s dimensions and details. Proper calibration of exposure time is essential to maintain both structural integrity and dimensional accuracy.

Slightly too long exposure times can distort your model. Positive features become larger and more expanded, while negative features like holes or gaps shrink or close entirely.
This is known as over-exposure. Excessive curing hardens unintended areas, reducing detail accuracy. Proper calibration ensures features are reproduced accurately without over-curing.
If the exposure time is excessively long, your model will appear bloated, and holes will be filled with cured resin.
This severe issue is also known as over-exposure. The excessive curing causes the resin to harden beyond the intended boundaries, distorting your model and filling in negative spaces.
What Exposure time should you use?
Finding the ideal exposure time for your resin requires testing with several calibration parts. Start by printing with different exposure times and evaluate which gives the best results for your specific setup.
Check your resin manufacturer’s website for recommended exposure settings. While these won’t be perfectly accurate, they provide a solid starting point. From there, print additional calibration parts using exposure times that are 10–20% longer and 10–20% shorter to fine-tune the settings.
For AmeraLabs resins, we have a list of recommended settings to help guide you.
Resin manufacturers tip #2
Do not blindly trust settings recommended by manufacturers, friends, or social media groups. Always test these settings and adjust them based on your results.
Exposure time depends on resin reactivity and various environmental factors. For example, room temperature significantly impacts resin curing speed. Warmer temperatures accelerate curing, while colder temperatures slow it down. As a result, you may need longer exposure times during colder months, especially in winter.
The ideal room temperature for resin printing is around 25°C. If your space drops below 20°C, you might start noticing issues with your prints.
Finding Resin Exposure Settings: Conclusion
There is no one-size-fits-all exposure time. The ideal duration depends on the model you’re printing. For example, pre-supported miniatures often feature thin tips on the supports (0.1–0.3 mm). Unfortunately, not all 3D printers and resins can handle such small supports without failure. These thin supports can cause the model to detach. To fix this, you can either increase exposure time slightly to thicken the supports or add additional thicker supports. Increasing exposure strengthens the supports but may result in a loss of fine details. Adding extra supports might leave some marks that require sanding after removal. Both options work well, and the choice between them depends on your priorities – whether it’s print quality or ease of post-processing.
Burn-in Layer Count and Exposure Time.
Also referred to as bottom exposure time, initial exposure time, or base layer exposure in some slicers.
What is Burn-in Layer Exposure Time?
Burn-in layer exposure time is the duration for which the printer cures the first few layers with a longer exposure. These initial layers help the model adhere strongly to the build plate, ensuring a stable foundation for the rest of the print.
The longer the burn-in layer exposure, the better the model will stick to the build plate, preventing it from shifting or detaching during the printing process. Proper burn-in settings are crucial for ensuring that the first few layers cure well and create a strong base for the model.
Recommended exposure times for burn-in layers can vary widely depending on your printer type and model.
When using color LCD 3D printers, we suggest making the burn-in layer exposure around 8–12 times longer than your normal layer exposure time.
For monochrome LCD or DLP 3D printers, use a burn-in exposure time that is 5–8 times longer than your normal layer exposure time.
Example:
- If your normal layer exposure is around 3 s, set the burn-in layer exposure to 15–25 s.
- If your normal layer exposure is around 7 s, set the burn-in layer exposure to 70–80 s.
When printing large or heavy prints, using 15–20 times longer exposures is acceptable, but it’s not recommended in most cases. Always cross-check with the resin manufacturer’s guidelines if you opt for longer exposures.
Ultimately, you’ll need to experiment with the burn-in layer exposure time. Start with a longer exposure and print a test model. If it’s difficult to remove the model from the build plate, your exposure may be too high – lower it and try again.
On the other hand, if the model falls off the build plate or detaches partially, you should increase the burn-in layer exposure.

Resin manufacturers tip #3
Burn-in layer exposure is a crucial setting for ensuring strong model adhesion to the build plate, but it’s not the only factor. If you’re experiencing issues with build plate adhesion, consider other aspects as well.
One effective approach is to hollow your prints and add vent holes. Hollowing your models significantly reduces the suction the printer has to overcome when peeling the model from the FEP film. As a result, you won’t need as much build plate adhesion to hold the model in place during printing. This technique can improve both print quality and efficiency by reducing the chances of adhesion failures.
Improving Build Plate Adhesion
Some 3D printer manufacturers recommend lightly sanding the build plate using 100–200 grit sanding paper. This process helps to slightly roughen the surface, enhancing adhesion. However, it’s crucial to keep the surface even, so avoid creating any significant divots or gouges during sanding. A smooth, slightly textured surface is ideal for strong adhesion.
Build plate adhesion issues may also arise from an uneven build plate. While defects in build plates were more common in the past, the quality of desktop 3D printers has significantly improved. Still, it’s important to check for flatness. To do so, use a metal straight edge ruler and a flashlight. Place the ruler on the build plate, then shine the flashlight along its edge. Gaps will be easily visible, helping you determine whether the build plate is perfectly flat.

How to Improve Build Plate Adhesion
For a helpful guide on leveling your resin 3D printer’s build plate, check out MatterHackers’ tutorial: “How To: Perfectly Level Your Resin 3D Printer’s Build Plate.”
If your models aren’t sticking to the build plate, it’s often because the build plate is out of level. In such cases, simply relevel the build plate to restore proper adhesion.
Another factor to consider is the condition of the FEP or nFEP (PFA) film. If the film is too tight, too loose, or worn out, it can cause issues with your models being pulled off the build plate during printing. Make sure to check the film’s condition and replace it if necessary.
Lastly, avoid using lubricants or other adhesion promoters on the FEP or build plate. These products are usually unnecessary for most resins and do not address the core issues causing adhesion problems. Using these additives is often a quick fix for surface-level issues instead of addressing the real underlying cause. Before turning to these products, relevel the build plate, increase burn-in layer exposure, check the quality of your FEP, and explore other troubleshooting options.
Number of Burn-in layers
Number of Burn-in Layers
The number of burn-in layers (also called the number of bottom layers, bottom layer count, or base layers in some slicers) determines how many layers will be exposed with a higher burn-in layer exposure time. These initial layers are exposed for a longer time to ensure a solid foundation that adheres securely to the build plate.
How Many Burn-in Layers Should You Use?
The ideal number of burn-in layers depends on the raft thickness of your model. Generally, the number of burn-in layers should be at least two layers higher than the number of layers in the raft. This ensures the entire raft is well-cured and gives extra curing to the first two layers of supports. This process helps create a stronger base for the supports, ensuring they adhere well to the raft and improves overall adhesion to the build plate.
For more detailed information on rafts in resin printing, check out resources like 3D printing raft in resin 3D printing: what you need to know.

We recommend using 2–4 layer rafts for optimal adhesion. Here’s how to set up your burn-in layers depending on your layer thickness:
- For 50 μm layers: Use a 100–200 μm raft and cure 4–6 bottom layers with longer exposure times.
- For 20 μm layers: Use a 40–80 μm raft and cure 4–6 bottom layers with longer exposure times.
- Without a raft: If you’re printing directly on the build plate, use only 2–4 bottom layers – there’s no need to cure more layers.
These settings help ensure a solid foundation for your print, increasing the chances of success, especially with complex models.
Resin manufacturers tip #4
If your model is delaminating in the middle of your raft, it’s likely that the number of bottom layers is incorrect. While some may suggest increasing the bottom layer count to improve adhesion, this is often unnecessary. In fact, under ideal conditions, 1 bottom layer is sufficient to bond your model to the build plate.

However, we recommend using 2–6 bottom layers for the following reasons:
Easier Raft Removal: If you’re using a raft, a thicker raft (with more bottom layers) is generally easier to remove without damaging the model. Our previous article covered this setting extensively: Why should you not use default 3D printing raft settings?
Compensates for Build Plate Misalignments: Slight imperfections or misalignments in the build plate can be balanced out with additional layers.
Transition Layer Count
Also called faded layers in some slicers.
What is the Transition Layer?
When using transition layers, the exposure time gradually decreases over several layers, allowing a smoother shift from the prolonged exposure of bottom layers to the standard exposure used for the rest of the print. Chitubox suggests that transition layers improve adhesion between these layers.

What Number of Transition Layers Should You Use?
If you’re unsure, start with 0 transition layers. There is no clear advantage to using transition layers unless you’re facing specific adhesion or layer bonding issues, which is rare with proper settings.
Not all 3D printers support the transition layer setting, so it may not have any effect even if it’s set in your slicer.
In most cases, you can print perfectly well with 0 transition layers, as long as your bottom layers are properly configured.
Resin manufacturers tip #5
Start with 0 transition layers and evaluate the results. If you notice delamination or poor bonding between the base and normal layers, consider adding transition layers. This gradual exposure change may help improve adhesion between the layers and prevent issues like delamination.
Lift Height
What is Lift Height?
Lift height refers to the distance the build plate moves up between layers to separate the printed model from the FEP film.
What Lift Height should you use?
The ideal lift height is one that allows the model to peel off the FEP without straining the printer. Thinner FEP films, such as 50 μm, may require a higher lift than thicker films like 127 μm. Similarly, larger printers (e.g., 10-inch) or loose FEP might also benefit from a higher lift. Resin properties can also affect the required lift.
For general use, we recommend a lift height of 10 mm for bottom layers and 7 mm for normal layers. This setting is conservative and works well in most cases.
Resin Manufacturer’s Tip #6
Once you are comfortable with resin 3D printing and achieve consistent results, experiment with lowering the lift height to find the minimum needed for reliable peeling. Reducing this height can shorten print times significantly.
Lift Speed
Also called platform lift speed in some slicers.
What is Lift Speed?
Lift speed is the rate at which the build plate rises from the bottom to the top after each layer’s exposure. It also defines the speed at which the model is peeled off the FEP film.
What Lift Speed should you use?
There are two main approaches to lift speed, and opinions can differ. Most manufacturers, including AmeraLabs, recommend using slower lift speeds to gently peel the model from the FEP, avoiding unnecessary stress. This is especially helpful for beginners who want to reduce the complexity of the printing process. We recommend 40–60 mm/min for normal layers and 5 mm/min for bottom layers.
Some users, however, have experimented with higher lift speeds, calling these “Vroom” settings. Speeds above 180 mm/min, and even up to 300 mm/min, are said to work effectively in reducing print times. While these fast speeds can be attractive, results are mixed, and such settings may not be ideal for all 3D printers, especially less expensive models. Additionally, using “Vroom” settings requires careful planning of support placement to ensure print success.
For more insights on fast lift speeds, YouTubers like Uncle Jessy and 3D Printing Pro share their experiences with “Vroom” settings.
Resin manufacturers tip #7
If you’re new to 3D printing, it’s best to start with a slower lift speed. As you gain experience and consistently achieve good prints, feel free to experiment with faster lift speeds to see if they improve your results.
Be aware that some slicers measure lift speed in mm/s, while others use mm/min. For example, 1 mm/s equals 60 mm/min. Always check the unit used in your slicer to ensure proper settings.
Newer slicers offer the ability to set different lift speeds for various stages of the lift sequence. For instance, Chitubox offers the “TSMC” (Two-Stage Motion Control) option, allowing for a slower peel from the FEP followed by a faster lift for the remaining distance. However, you only need to lift the build plate high enough to peel the model from the FEP, so the second lift stage may not always be necessary.
Lastly, some 3D printers have a built-in maximum lift speed that overrides your slicer settings. If you notice that your printer isn’t lifting as quickly as expected, this could be the cause, even if you’ve set a high lift speed in your slicer.
Retract Speed
What is Retract Speed?
Retract speed, also known as platform lower speed in some slicers, refers to the speed at which the build plate lowers into the VAT after each layer exposure.
What Retract Speed should you use?
Follow the retract speed recommended by your 3D printer manufacturer, typically between 150–400 mm/min. This speed usually does not significantly affect print quality.
A slower retract speed will extend the overall 3D printing session.
Resin Manufacturer’s Tip #8
For very viscous resins, a lower retract speed is recommended. It helps reduce turbulence and allows resin to escape from under the build plate more efficiently. For most resins, however, the impact of retract speed on print quality is minimal.
Rest Time After Retract
What is Rest Time After Retract?
Rest time after retract (also known as light-off delay, exposure off time, total off time, or rest time before lift in some slicers) is a setting that introduces a delay after the build plate retracts to its lowest position. This pause allows time for the resin to fully settle before the next layer exposure begins.
After the build plate reaches the bottom, it stops for the predefined rest time. Only after this pause does the light source turn on for the next layer exposure. This helps ensure that the resin between the model and FEP is properly settled.
What Rest Time After Retract should you use?
Typically, a rest time of 0.5 to 1 second is sufficient for the resin to stop moving. However, for viscous resins, a longer rest time is needed, while liquid resins may require a shorter rest time.
Different 3D printers and slicers handle this setting differently. In some slicers, such as Chitubox, it’s called “Light-off Delay,” while others refer to it as “Rest Time After Retract.”

Resin manufacturers tip #9
Since slicers treat rest time after retract setting differently, observe how your 3D printer behaves during printing. Run a so-called “dry run.” Print something without any resin in VAT and check if there’s actually a pause for a second before each layer exposure. If not, adjust this setting until you find the right one to give your printer some rest between the end of retraction and new layer exposure. If there is not enough rest time after retract, you might notice an uneven surface called “blooming” on your prints. We have covered that in this article: https://ameralabs.com/blog/light-off-delay-blooming/

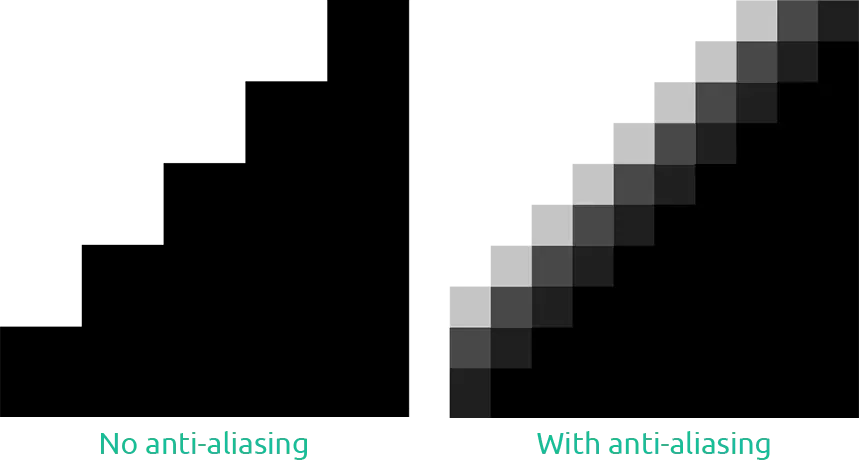
Anti-aliasing, Grey Level, and Image Blur
What are Anti-aliasing settings?
In resin 3D printing, LCD screens consist of black and white pixels. When the pixel is black, it blocks the UV light, preventing the resin from curing. When the pixel is white, the UV light passes through, curing the resin. Anti-aliasing adjusts the pixels at the edges of the model to grey, creating smoother transitions between layers and reducing the pixelation effect. This can help reduce visible layers and pixel lines, making prints appear smoother.
However, using anti-aliasing may lead to a slight loss of detail in the intricate parts of a model.
What Anti-aliasing settings should you use?
Dennys Wang has found that an Anti-aliasing level of 0 or 2, grey level 0, and image blur pixel 2 offer the best results for smoother prints. These settings balance the smoothing effect with retaining model details. You can find more about his findings in his video How To Get Smooth Surface With Print Angle And Antialiasing.
You can learn more about anti-aliasing from this great explanation video by Autodesk: Sub-pixel resolution for DLP 3D printing.

Resin Manufacturer’s Tip #10
If you’re new to 3D printing, start without using anti-aliasing. This will help you understand your printer’s capabilities. Once you’ve gained consistency in your prints and are comfortable with the process, you can experiment with anti-aliasing to enhance the print quality.
By using Anti-aliasing, you can get smoother prints, less visible layers, and pixel lines. However, theoretically, you might lose some details on the intricate parts of your model.
UV power
What is UV power?
UV power, also known as LED power, Light PWM, or UV Light power, refers to the adjustable output power of the LEDs in some 3D printers. This setting determines how much UV light the LEDs produce, which in turn affects how quickly the resin cures. Higher UV power allows the resin to cure faster, reducing print time.
What UV Power should you use?
What UV Power should you use?
It is generally recommended to leave the UV power setting at its default when you first receive your printer. This ensures optimal balance between curing speed and long-term printer maintenance.
Resin manufacturers tip #11
By default, UV power is often set between 60–100%. You can increase it to 100% to speed up your printing by shortening exposure times. However, be cautious, as higher UV power can shorten the lifespan of your LCD screen. UV light and heat can degrade the screen over time. Always consult the manufacturer of your 3D printer to understand the best settings for your specific machine and resin.
Other factors that will impact your prints
As we have mentioned several times in this article, you have to adjust your resin 3D printing settings based on what you want to print. You also have to take into consideration several other factors.
Supports
As we’ve covered throughout this guide, adjusting your resin 3D printing settings is essential based on the model you’re printing. However, several additional factors can affect the quality and success of your prints, particularly when it comes to supports.
Supports and Their Impact on Prints
The choice of supports plays a crucial role in the final quality of your print. Here’s how different factors come into play:
- Thicker Supports: If you opt for thicker supports, you can print at faster speeds with shorter exposure times. However, this will leave scars or marks on your model, which will need sanding. Thicker supports provide more stability, especially for heavier or larger models.
- Thinner Supports: Thinner supports result in fewer marks on your model, leading to smoother finishes. However, they require slower print speeds and longer exposures, which increases print time. Additionally, while thinner supports reduce the impact on the surface, they may not offer as much stability, particularly for heavier or complex models.
- Pre-supported Miniatures: Pre-supported miniatures often come with very thin supports. In these cases, you may need to increase exposure times and print slower to avoid print failures.
- Large and Heavy Models: For larger and heavier models, it’s essential to use both thicker supports and longer exposures to ensure that the model stays securely attached to the build plate.
- Intricate Models (e.g., jewelry): Fine details require careful exposure settings. Thin supports and slower lift speeds are necessary to preserve the delicate features of intricate models. Additionally, very slow and precise prints are needed to capture the finest details without distortion.
- Dimensionally Accurate Models: When printing models where precision matters (e.g., mechanical parts), proper exposure times and the strategic placement of supports are essential. Incorrect exposure or poorly placed supports can negatively affect the model’s accuracy.
Resin Type and Supports
The type of resin used also impacts your choice of supports:
- Flexible Resins: Flexible resins typically require thicker supports due to their pliable nature. The thicker supports help stabilize the print and prevent warping or movement during printing.
- Hard Resins: Hard resins are less prone to deformation, so thinner supports work well without compromising the stability of the print.
Choosing the right supports and adjusting your settings based on the model and resin properties are key to achieving successful and high-quality 3D prints. Always test and fine-tune your settings as you gain experience with different models and resins.
Model orientation
Proper model orientation is a critical aspect of achieving the best quality in resin 3D printing. Here’s what you should keep in mind:
- Minimize Cross-Section Size: Orient your models so that the cross-section of each layer is as small as possible. Smaller cross-sections reduce the amount of resin exposure needed for each layer and help improve print quality and speed. This will also minimize the risk of layer misalignment or deformation.
- Avoid Quick Transitions Between Small and Large Cross-Sections: Rapid changes between different-sized cross-sections can cause print issues. These transitions can lead to problems such as shifting layers or increased stress on the model. A gradual change in layer size can help maintain print stability.
However, there are situations where model orientation may not be ideal, and adjustments may be needed:
- Limited Support Placement: Sometimes, due to the model’s shape, there might not be sufficient places to place supports. For example, you wouldn’t want to place supports on the face of a tabletop gaming miniature, as this could ruin the model’s appearance. In such cases, it may be necessary to find alternative orientations that balance print quality and support placement.
- Size Limitations: Some models may be too large to fit inside the printer’s build volume when oriented in certain ways. In these cases, you may need to adjust the orientation to make the model fit while ensuring optimal support and resin use.
- Large Cross-Sections: If your model’s orientation results in large cross-sections despite your best efforts, it’s best to switch to more conservative settings. This means using longer exposure times, slower speeds, and more extensive support structures to ensure the print is successful.
In short, always aim for the most efficient model orientation, but be prepared to adjust based on the size of the model, its shape, and support requirements. This will help you achieve the best results while minimizing printing issues.
Room temperature
The temperature of your printing environment plays a significant role in resin 3D printing quality. Here’s why room temperature matters:
- Optimal Resin Temperature: Resin manufacturers recommend maintaining a room temperature of around 25–35°C for optimal results. At these temperatures, the resin cures efficiently, and the printer’s settings work as expected.
- Impact of Low Temperature: If the room temperature drops below 20°C, the resin may become too viscous, making it harder for the printer to properly cure each layer. This can lead to issues like incomplete curing, poor adhesion between layers, or failed prints.
- Increased Print Failures in Cold Conditions: Printing in colder environments can cause problems such as slower curing times, misprints, or layers not bonding properly. Additionally, some printers may experience more significant issues with resin pooling or inconsistent light exposure when the resin thickens due to lower temperatures.
Tips for Dealing with Low Room Temperature:
- Ensure Proper Heating: If you’re working in a cold room, consider using a space heater to maintain a temperature in the recommended range. A consistent temperature will help prevent the resin from thickening and ensure optimal performance.
- Resin Storage: Store your resin in a temperature-controlled environment. Some users also store resin bottles in insulated boxes or warmers to keep them at the right viscosity for printing.
- Check Your Printer’s Settings: If you’re printing in colder conditions, you may need to adjust exposure times, layer curing times, or lift speeds to accommodate the thicker resin.
In general, maintaining a consistent temperature within the recommended range will ensure smoother prints and minimize issues caused by resin inconsistencies.
Hollowing and wall thickness
Hollowing your models and adjusting wall thickness are crucial factors to consider for improving your print quality and efficiency. Here’s why:
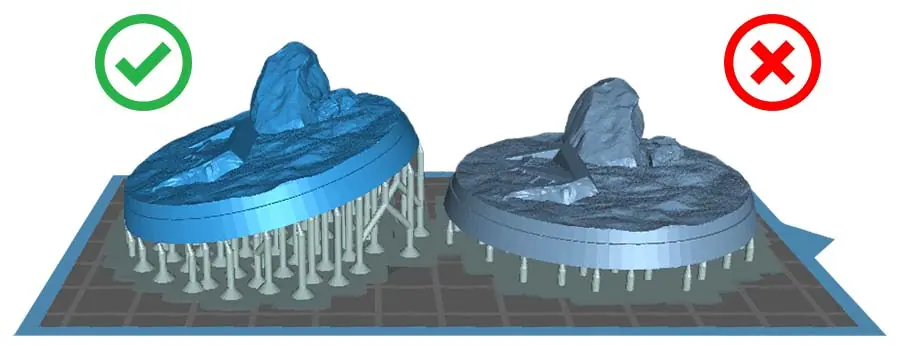
Why Hollow Your Models?
- Reduced Adhesion to FEP: Solid models are more likely to stick to the FEP (film) surface during printing, making it harder to peel the model off. Hollowing out the model helps prevent this, as the resin inside the model can escape more easily during the lift process.
- Lighter Prints: Hollow models are much lighter than solid ones, making them easier to handle and less likely to cause print failures due to excessive weight.
- Faster Printing: With less material to cure, hollow models typically print faster, saving both resin and time.
Recommended Wall Thickness
- 1–4 mm Wall Thickness: For most models, a wall thickness between 1 mm and 4 mm is ideal. Thin walls (around 1 mm) work well for smaller models, while larger models benefit from thicker walls (up to 4 mm).
- Balance Between Strength and Flexibility: Thinner walls (around 1 mm) make it easier for models to separate from the FEP but are also more fragile. Thicker walls (around 3–4 mm) provide additional strength, though they may require longer exposure times to ensure proper curing.
- Avoid Over-Thick Walls: While thicker walls offer more stability, extremely thick walls can result in unnecessary resin use, increased curing time, and potential print failures due to overexposure.
Vent Holes
- Essential for Hollow Models: When hollowing out models, always remember to add vent holes to allow air to escape as the build plate moves upward. Without these holes, air pressure could cause deformities in the print or cause it to fail.
- Location: Place vent holes at the top of the model or in areas where air would naturally accumulate.
Summary:
Vent holes: Crucial for hollow models to avoid print failure and air pressure buildup.
Hollow models: Reduce adhesion, weight, and print time.
Wall thickness: 1 mm for smaller models, 3–4 mm for larger ones, for a balance of strength and flexibility.

Your risk tolerance
Your approach to 3D printing settings should vary depending on the importance of the print and the cost of failure. Here’s a breakdown of how your risk tolerance can guide your decisions:
Printing Large, Expensive Models (Conservative Approach)
- Use Conservative Settings: When printing large models that consume a lot of resin, it’s essential to prioritize stability and minimize the risk of failure. Opt for slower print speeds, longer exposures, and more support structures to ensure a higher likelihood of success.
- Higher Resin Cost: A failed print of a large model means wasting significant amounts of expensive resin. Reprinting will not only cost resin but also valuable time. Thus, it’s better to take the extra time upfront to adjust your settings carefully and avoid costly mistakes.
- Preemptive Adjustments: Pay extra attention to model orientation, support placement, exposure time, and other critical settings. A careful approach helps ensure the print succeeds on the first try, even if it takes longer.
Printing Smaller, Less Important Models (More Experimental Approach)
- Embrace Experimentation: For smaller or less important prints, feel free to experiment with new settings. Since these models are not critical and typically use less resin, the risk of failure is more tolerable.
- Cost of Failure Is Low: The failure of a small print won’t be as costly in terms of resin, and the time to reprint is usually shorter. This gives you the freedom to test different settings to optimize print quality without significant consequences.
- Multiple Parts Strategy: If you’re printing multiple parts at once, and one fails, others may still succeed. This allows you to experiment with different settings while minimizing the impact of any failures.
Key Takeaway:
- For important, large models: Focus on safety with conservative settings to ensure success at the cost of longer print times.
- For unimportant, small models: Be adventurous and explore different settings since the cost of failure is lower.
By aligning your settings with your tolerance for risk, you can balance quality, cost, and print time effectively.
Final words
In the world of resin 3D printing, there are no one-size-fits-all settings. The most optimal settings for your prints depend on many factors, including the model itself, support structures, orientation, environmental conditions, and your risk tolerance. Each of these elements plays a crucial role in achieving the best results for your specific needs.
It’s important to think about the bigger picture and consider how different settings interact. Fine-tuning these factors will lead you to the perfect balance for your 3D printing projects. Keep experimenting, stay patient, and don’t hesitate to adjust based on the print’s success or failure.
We hope this article has provided valuable insights into the nuances of resin 3D printing and will guide you toward better, more consistent prints. Good luck with your future projects, and may your prints always be successful!
Frequently Asked Questions
Q: How do I accurately determine the appropriate exposure time and layer thickness for different resin types and printing scenarios, considering factors like model intricacy and desired printing speed?
A: Determining the right exposure time and layer thickness for your resin 3D prints can be a trial-and-error process. Factors like the resin type, model complexity, and desired printing speed all play a role. Start by consulting the manufacturer’s recommendations and then conduct test prints with varying exposure times and layer thicknesses. Keep in mind the trade-offs between print quality, printing time, and resin usage. TGM-7 users should consult Key Strategies For 3D Printing With TGM-7 Resin blog post for more detailed insights.
Q: If I experience issues with build plate adhesion despite adjusting burn-in layer settings, what additional troubleshooting steps can I take, especially concerning factors like FEP tension and build plate leveling?
A: If you’re facing issues with build plate adhesion despite adjusting burn-in layer settings, there are several troubleshooting steps you can take. Check the tension of the FEP sheet, ensure the build plate is properly leveled, and inspect for any defects or irregularities. Additionally, consider hollowing your prints and adding vent holes to reduce suction forces. Our Resin 3D Printing Troubleshooting blog post provides comprehensive guidance on addressing build plate adhesion and other resin 3D printing problems.
Q: What are the potential benefits and drawbacks of experimenting with higher lift speeds or UV power settings, and how can I mitigate risks such as reduced print quality or accelerated wear on the 3D printer components?
A: Experimenting with higher lift speeds or UV power settings can offer potential benefits such as faster print times but may also introduce risks like reduced print quality or accelerated wear on printer components. Start with conservative settings recommended by the manufacturer and gradually adjust them while monitoring print quality. Be aware of the limitations of your specific 3D printer and resin type. For detailed insights and recommendations on optimizing lift speeds, refer to our 9 Settings to Change for Faster Resin 3D Printing blog post.
Related Posts
- Choosing Best 3D Resin Printer for Beginners – Need a printer to start? This helps you pick one that won’t trip you up.
- 3D Printing Miniatures – Want to print minis? This gets you going with the basics. FREE STLS included!
- Rapid Prototyping with 3D Printing – Into engineering? This sets you up for quick prototyping.
- Business Resin Printing Setup – Setting up at home or for business? This keeps it simple.
- Town Calibration Part – Test your settings? This print’s a must to get it right.
New to settings? Check our shop for resins that’ll make it less of a hassle!
