
Updated on September 23, 2020
If you are new to resin 3D printing, you may be inclined to use default settings. In this article we will cover why using default 3D printing settings for your raft layer may be a bad idea.
Have you been using default raft this whole time? Have you ever wondered which default thicknesses are correct ones? Is it 1mm or 3mm? In this article we will share one simple technique which will:
- Increase success rate of your prints
- Shorten your overall print time
- Reduce wear of your FEP
If you are not familiar with why raft is important, read our previous article: 3D printing raft in resin 3D printing: what you need to know.
Short recap of why you need raft and longer bottom layer exposures
Like most other 3D printing technologies SLA 3D printing produces objects layer-by-layer by selectively curing resin. After each layer is cured, build plate moves up and separates newly cured layer from FEP film or PDMS silicon. Right after that, process continues with curing the very next layer followed by its separation from VAT bottom. This process continues up until an entire object is produced.
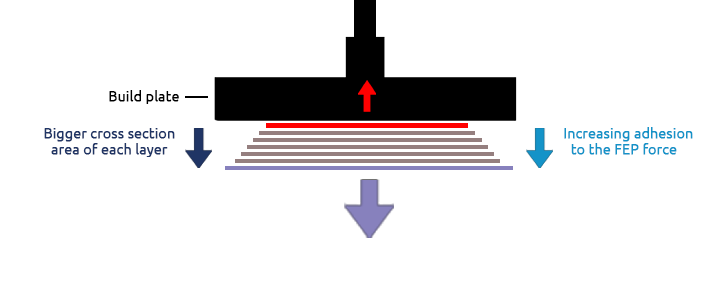
A lot of 3D printing failures happen due to previously mentioned layer separation from FEP film action. When more and more layers of a model are cured, separation of each subsequent layer puts higher and higher stress on all previous layers and their connections. It goes without saying that first connection between your build plate and first layer has to withstand separation forces of an entire model! Therefore, it needs to stick to build plate extremely well.
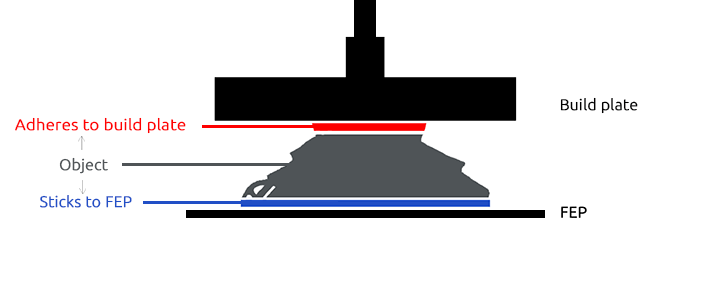
So how do we increase first layer’s build plate adhesion?
We can do two things.
First, we can add a raft to increase the size of the surface area of the first layer. The larger the surface area, the stronger the adhesion forces.
Also, we can increase exposure time for several bottom layers.
Using default raft 3D printing settings is a huge mistake!
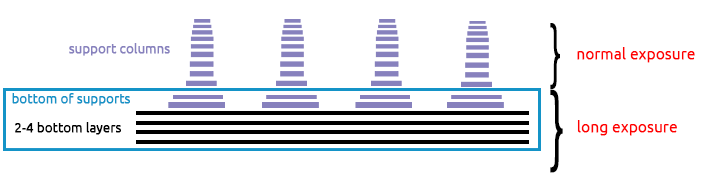
Most common slicer software suggests using default raft settings of 1mm thickness and then 3D printing just 4-12 bottom layers with prolonged exposure. Let’s dive into what happens when you use these default settings.
Let’s say you 3D print with 50 micron (0,05mm) layer height. Your 1mm raft will then consist of 20 layers (1mm / 0,05mm = 20). If you set the number of bottom layers to be 4 in your slicer’s settings, only first 4 layers of the raft will be cured with prolonged exposures. All remaining 16 layers of your raft will only be cured with normal layer exposures! First 4 layers will be very well cured, have good build plate adhesion and in-between themselves. The following 16 layers in return will have weaker connections.
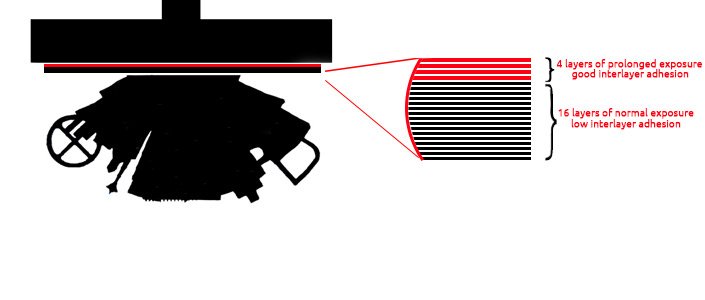
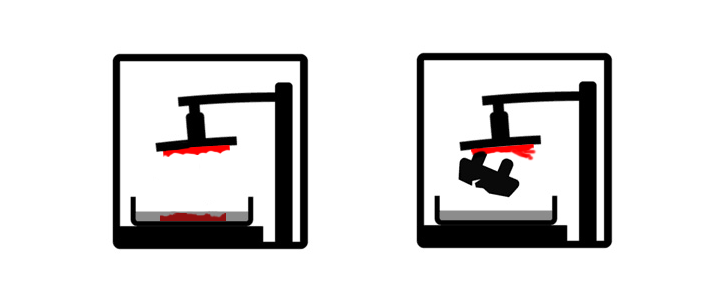
Peeling off large layers of your raft is not an easy task for your 3D printer. Sticking to FEP will be very high due to the large cross-sectional area. Separation from FEP film of each of these layers puts stress on previously cured layers and weakens the interlayer adhesion as well as build plate adhesion, therefore, increasing the chance of failure.
There’s a huge chance of failure somewhere in between 4th and 20th layer of your raft. If that happens, you will find a thin part of your raft stuck to the build plate, with the remaining print stuck to the FEP. The best-case scenario – your print will sort of succeed and you may see some “cracks” and layer delamination on the raft.
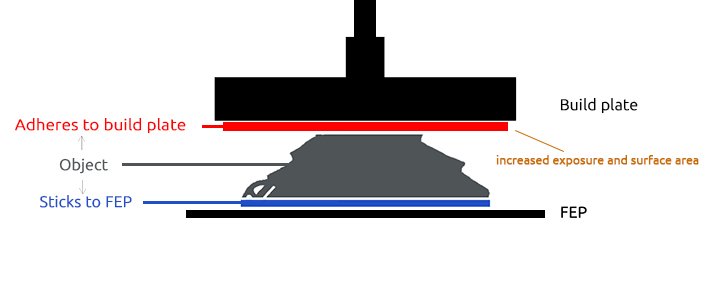
Sloped rafts
To make things even worse, slicers recommend using slope on your raft.

Raft slope is the angle between the raft edge and the horizontal plane. Usually, the smaller the angle is, the easier it is to scoop up the model from the building plate according to the lever principle. Sounds nice, doesn’t it?
However, that results in constantly increasing cross sectional area of each subsequent layer. In other words, each layer will be wider than the previous one. The more you increase the area of your layer, the harder it sticks to the FEP. Thus, sloped rafts further increase the risk of failure.
FEP deterioration
Another argument against thick raft is the increased FEP wear. Each of those wide layers of your raft will put a lot of stress on your FEP and it will deteriorate faster. Later you will see that your FEP is becoming less transparent, cloudy or stretched out.
The only “positive” feature of thick raft
There’s just one reason why using thicker raft might be a good idea. After printing it will be easier to remove your models from the build plate. Thinner rafts usually break when you try to scoop models off the build plate. You may have to thrust it with a metal spatula several times before you get the model off. However, most often you would throw out the raft along with the supports. So you do not have to worry about it breaking. This argument for thick raft does not make much sense in most of the cases.
On the other hand, when using plastic spatula, thin rafts can be hard to remove. Therefore, we would advise on using metal spatula or other sharp blade instead. Do not worry about scratching your build plate when removing your prints. Small scratches will only increase the build plate adhesion.
Solution – thinner raft
Solution to all of the above mentioned issues is quite simple. Just use a thinner raft!
We recommend using 2-4 layer thick rafts.
If you print with 50 micron layers, use 100-200 micron raft.
If you print with 20 micron layers, use 40-80 micron raft.
Another important thing – the number of bottom layers with prolonged exposure has to be 2 layers more than the number of layers in the raft. This will ensure that entire raft is well cured and that first two layers of supports also get cured a little bit more. This creates stronger base for the supports and adheres them very well to the raft.
To sum up, our go to raft 3D printing settings are:
- If you print at 50 micron layers: use 150 micron thick raft and cure 5 bottom layers with longer exposure
- If you print at 20 micron layers: use 80 micron thick raft and cure 6 bottom layers with longer exposure
This technique will create a good foundation for your prints, reduce failures and will not stress your 3D printer as much as default raft settings.
Frequently Asked Questions
Q: How do the recommended raft settings compare in terms of material usage and overall printing costs compared to default settings?
A: Thinner rafts and additional bottom layers with prolonged exposure, as suggested in the recommended settings, may use slightly less material overall compared to default settings. However, the actual impact on material consumption and printing costs can vary based on factors such as the size, complexity, and number of prints. While thinner rafts may reduce material usage, the increased number of bottom layers with prolonged exposure could marginally increase material consumption. Despite this, the benefits of reduced print failures and improved print quality often outweigh the minor increase in material usage, resulting in overall cost savings in terms of time and resources.
Q: Are there specific types or brands of resin that are more compatible or perform better with the recommended raft settings compared to others?
A: The compatibility of recommended raft settings with different types or brands of resin is an essential consideration for resin 3D printing enthusiasts. While certain raft settings may work well for one resin, they may not yield the same results for others. Resin properties, including viscosity, curing time, and adhesion characteristics, can vary between brands and types, potentially influencing the effectiveness of raft settings. Experimentation and testing with various resin formulations may be necessary to determine the optimal raft settings for each specific resin type.
Q: What are some alternative methods or techniques for improving print quality and reducing failures in resin 3D printing, besides adjusting raft settings?
A: Exploring alternative methods or techniques for improving print quality and reducing failures in resin 3D printing beyond adjusting raft settings can provide valuable insights for enthusiasts seeking to optimize their printing process. Factors such as resin curing times, build plate preparation methods and printer calibration also play significant roles in print success.
Be sure to check out our Resin 3D Printing Troubleshooting: A Comprehensive Guide for more insights and tips on resing print failure troubleshooting.
Additionally, considering post-processing techniques such as UV curing and surface treatments can further enhance print quality by improving surface finish and durability. Experimenting with different combinations of settings and techniques, alongside seeking guidance from online communities and resources, can assist enthusiasts in refining their printing process and achieving better results.
Other articles from AmeraLabs
- The Complete Resin 3D Printing Settings Guide for Beginners
- Better surfaces with Light-off delay. Blooming phenomenon
- How to succeed with your first 3D print
- 9 common mistakes when switching from FDM to SLA 3D printing
- 6 Key Principles of 3D Printing Supports that Work
- Impressive calibration part for resin 3D printers together with the guide on how to understand its features
Visit our shop!

