This time we will take a look at one widely discussed issue of resin 3D printing called “blooming”. We will discuss how to use a short pause setting called light-off delay, rest time after retract, or wait before print to avoid it. Although this issue consistently happens with MSLA 3D printers, it can also occur with genuine DLP 3D printers. This article should also interest both beginners and experienced 3D printing professionals. So, let’s dive in.
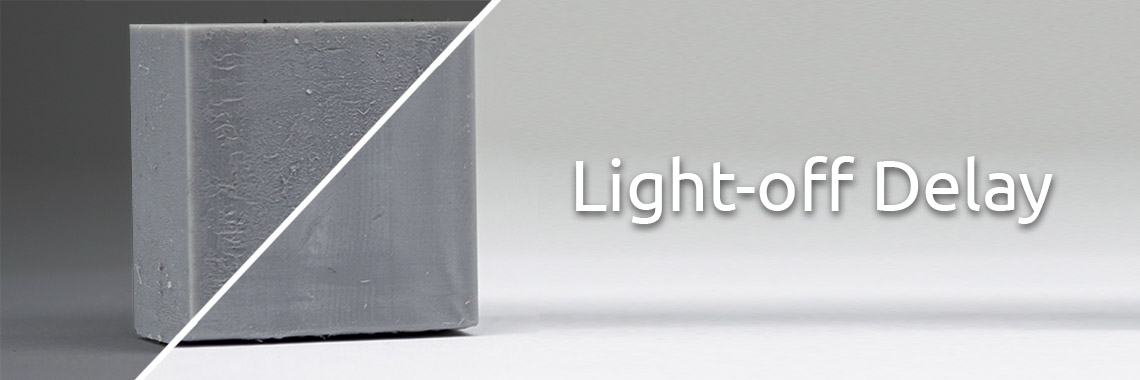
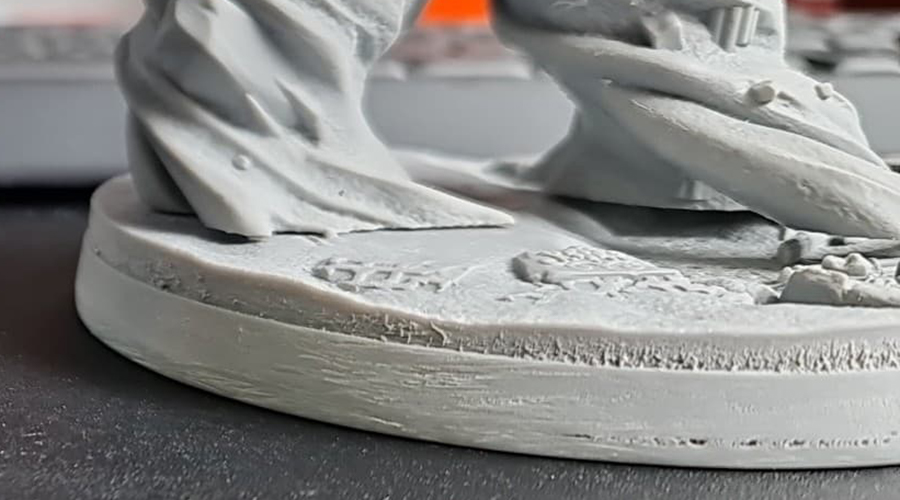
Recently, the resin 3D printing community created the term “blooming”. It refers to the issue when after taking a 3D printed object from the build plate, it has a greasy surface that reminds of mucus or gel. You can usually wash away this gel, but you get uneven and rough surfaces even then. Probably one image is better than a thousand words.
After reading this article, you will know why this issue happens and how to use a setting called light-off delay, rest time after retract, or wait before print, as well as other techniques to avoid it.
Sources of the issue
Perhaps the most noticeable uniqueness of resin 3D printing is its materials. Liquid, photosensitive resins together with appropriate light sources are used to transform liquid material into solid. In the most popular bottom-up resin 3D printing method, a reservoir (also called VAT) is filled with liquid resin. The 3D printer prints an object upside down on a metal build plate. After each cured layer, the build plate moves up, delaminates the freshly cured layer from the bottom of the resin tray, and moves down again to cure the subsequent layer. When all layers are completed, you have already 3D printed your object, which is now hanging upside down.
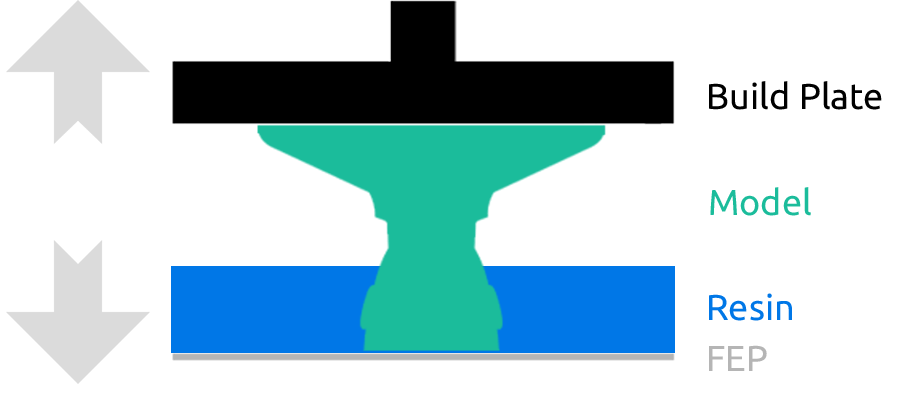
After the 3D printer prints each individual layer, the build plate has to go up and back down. During downward movement, the previous layer and its cross-sectional area squeeze liquid 3D printing resin out of its way. When the build plate gets down completely, only a small gap (depending on your layer thickness) filled with resin remains between the bottom surface of your resin VAT and the previously cured layer. See the image below.
The problem lies in the squeezing motion of resin between the previous layers and the bottom of the VAT. These liquid turbulences are the root cause of a blooming effect.
However, that does not happen every time. That is because specific conditions must be in place to produce this undesired effect. “Blooming” is produced by the premature start of new layer exposure. Simply saying, your 3D printer displays a new layer on the LCD screen or projector too early. So early that resin is still moving while being pushed out of the gap between the bottom of resin VAT and the topmost surface of the previous layer. If your resin moves when exposure of a new layer starts, it will start to cure. A liquid resin will start to become a gel, i.e., turn from liquid to solid, while still being squeezed. Thus, “blooming” is simply prematurely gelled material that your 3D printer pushed out of the gap between the VAT bottom and the previous layer. This often results in gel-like mucus on your object walls.
Next, we will run through all of the factors we were able to think of that have an influence on the “blooming” effect.
Factors that increase the odds of the “blooming” effect
Material curing speed
Modern fast curing materials tend to have more severe issues of such premature curing. In short, if the material is slower, it will not start to cure and transform into gel too quickly, even while moving. This would somewhat prevent premature gelation of material. However, if you have high viscosity and relatively fast curing material, imagine how this will end up! Even relatively slow materials became quite “fast” with the rise of monochrome LCD screens. With higher light output and shorter exposures, issues like “blooming” became more prevalent.
Cross-sectional area
A high cross-sectional area of your layers means that the 3D printer has more material to push out of the gap to prepare for the new layer. If you print non-hollowed models or models with very thick walls (more than 2.5 mm), you must be very careful and adjust your printing settings appropriately to avoid the “blooming” effect. While properly hollowed models will rarely face this problem.
Material viscosity
Material viscosity plays an important role here. Due to natural viscoelastic properties, more viscous materials tend to be much more difficult to squeeze out of thin gaps. One can imagine liquid honey and, for example, olive oil. An attempt to squeeze both of them between two metal plates should clearly indicate which requires more effort. Simply saying, it takes more time to push higher viscosity materials out of the gap and prepare for the new layer.
Temperature
The influence of temperature might be negligible here. But what works in winter may not work in summer. Temperature changes can significantly affect the viscosity and cure speed of the materials.
Down movement / retract speed
Retraction speed is also important. This speed determines how fast the build plate moves from the highest position of the cycle to the lowest, i.e., the bottom of the VAT. When the build plate moves down, it pushes resin out of its way. The faster you go, the higher liquid turbulences will be.
How to solve the “blooming” effect?
Since the problem is complex, there are two main ways to overcome this issue. Let’s discuss them one by one.

Apply light-off delay (a.k.a. rest time after retract or wait before print) setting
This is the most important setting to overcome the “blooming” effect. Most 3D printers and slicers have this setting, and you only have to find it. Chitubox slicer calls this setting “light-off delay” or “rest time after retract“. Lychee slicer calls it “wait before print“. Voxel dance tango slicer calls it “wait before cure“. Essentially, this setting determines the delay of the very next layer exposure when the build plate is already at its lowest position. Right after the build plate gets to the bottom, it stops, the system waits for this pre-defined duration and then turns on the light source and starts the exposition of the new layer. This delay brings more time to fully squeeze the resin out of the gap between the previous layer and the bottom of the VAT.
To fully overcome blooming, 0.5 s to 1 s of light-off delay rest time is generally enough.

But you must be careful, as different resin 3D printers treat this setting differently. Some 3D printers actually require you to input just pure rest time after retract, like 1 second, but there is another side of the story here. When using other 3D printers, you will need to enter the duration of a complete layer preparation cycle. I know it sounds confusing, and, to be honest, it is! Let me explain it in more detail.

It is the time between the exposure finish of one layer and the exposure start of the next one. The problem here is that determination of this setting might be very tricky, and this value can change dramatically if you change some other settings (like motor movement speed or lifting heights). The only way to measure it is an empirical one.
First, you must set your motor speeds and lifting heights and then do a “dry run” with your 3D printer, i.e., 3D print without resin. Measure the complete duration of the motor movement cycle with a chronometer and add roughly 1 second. That is your new light-off delay. Enter it into the software and double-check with another “dry run”. After the motor has finished its movement, there should be approximately a 1-second pause before a light source is turned on to start the cure of a new layer. If you do, you are good to go. Otherwise, increase the light-off delay setting by another second.
Reduce cross-sectional area as much as possible
This is quite a worn-out recommendation, but it applies to many resin 3D printing issues. We covered how it creates higher suction forces in our previous article about 3D printing supports. If you print non-hollowed models with a large cross-sectional area of layers, you will also have difficulties with the “blooming” effect. A large area will result in severe liquid turbulence and difficulty pushing it out of the gap between the VAT bottom and the previous layer. Simply saying, it will require more time and, thus, increase your waiting and printing time. Therefore, reduce the cross-sectional area of your prints as much as possible. You can do that by properly hollowing and orienting your models.
3D printing experiment
Let’s make a quick experiment that would help to understand how the “blooming” effect is present with various light-off delay and retract speed settings. We did not mean to make this trial extremely scientific. Its purpose is to show this phenomenon in a simple manner and also how some specific 3D printing settings affect results.
For this experiment, we 3D printed a cube with 30 mm x 30 mm dimensions. We did not hollow this cube on purpose to exaggerate the effect for visual purposes. We 3D printed with TGM-7 resin on Phrozen Sonic Mini 4K at 50 um layers and 2.5 s exposures. After printing, the objects were cleaned with isopropyl alcohol and post-cured for 30 minutes. Our 3D printing room has a controlled environment with an ambient temperature of 25 °C. Let’s review the results.
0 sec and 1 s light-off delay. 160 mm/min retract speed.
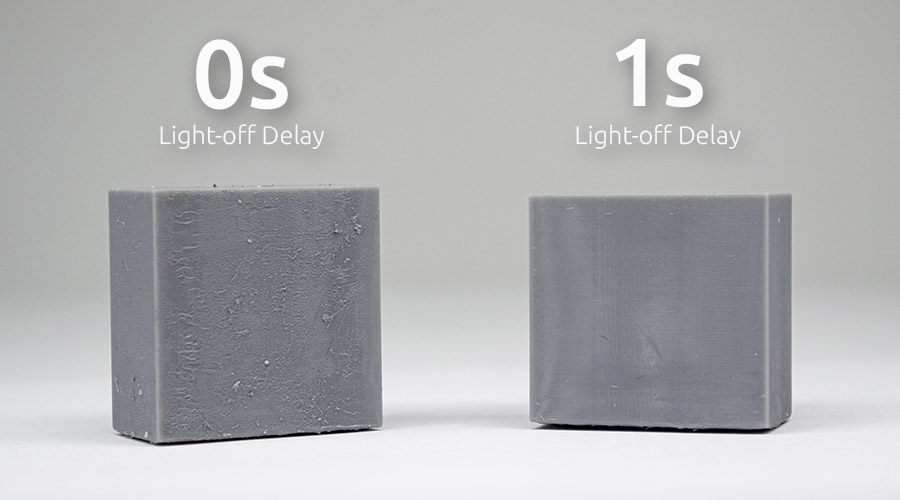
It is clearly visible that the absence of wait before print produces significant surface “blooming” defects. On the other hand, a 1 s rest time after retract completely eliminated “blooming”.
Let’s take a look at how severe the “blooming” effect is with various light-off delay settings.
0 sec and 0.25 s light-off delay. 160 mm/min retract speed.
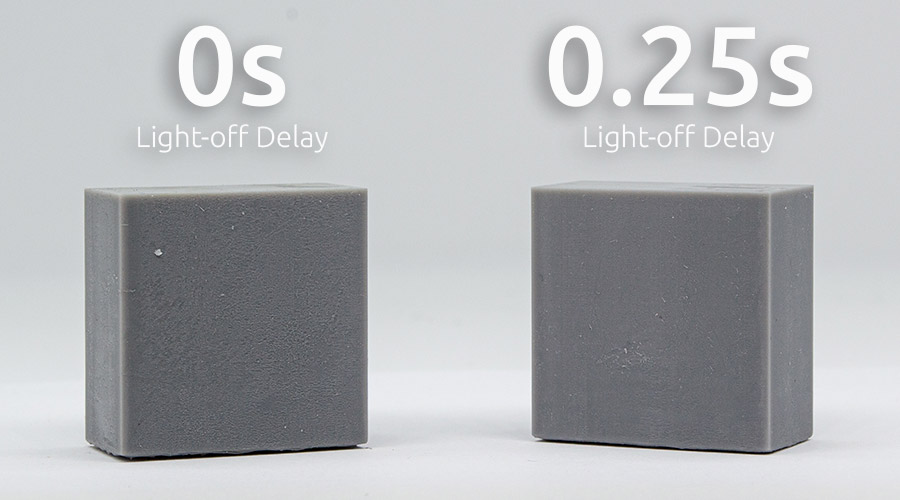
As previously mentioned, surface damage is clearly visible with a 0 s light-off delay. But even with a 0.25 s rest time after retract, there is a significant improvement, although some defects are still seen.
0.5 s and 0.75 s light-off delay. 160 mm/min retract speed.
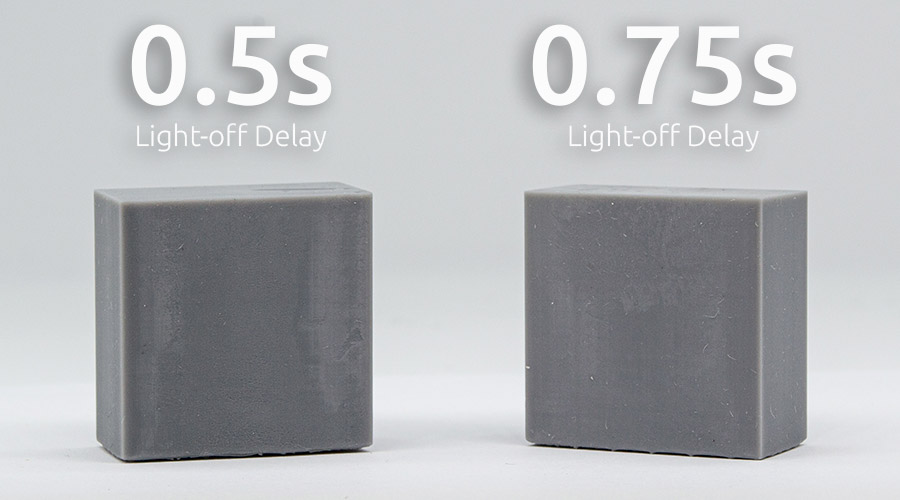
At a 0.5 s rest time after retract, scars on the surface are still barely present, however, at a 0.75 s – almost no “blooming” effect is present.
1 s and 1.25 s light-off delay. 160 mm/min retract speed.
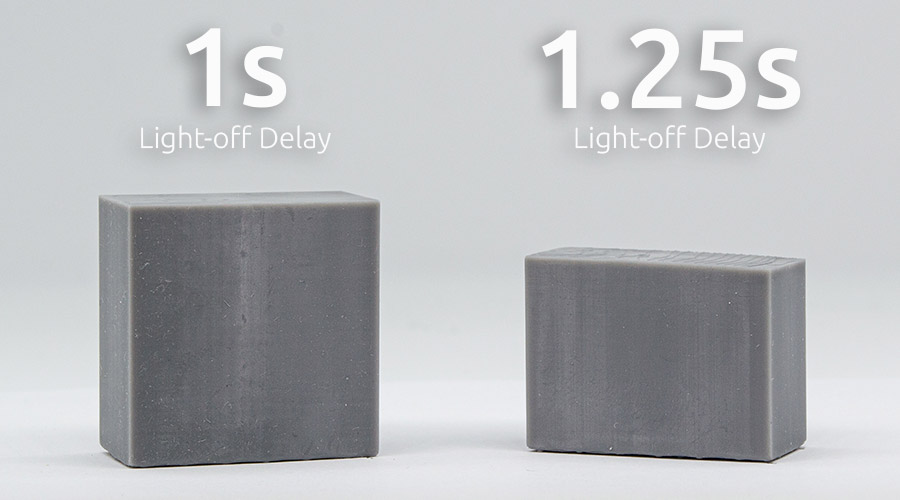
Ignore the fact that there is just half of the cube. Our bad… But results are clearly visible – with a 1 s and more of light-off delay, there is a negligible effect of “blooming”.
0 s light-off delay. 20 mm/min retract speed.
By the way, we also ran a quick experiment to see if drastically reduced retract speed joined with 0 s light-off delay can improve the surface quality and reduce “blooming”. The result is below.
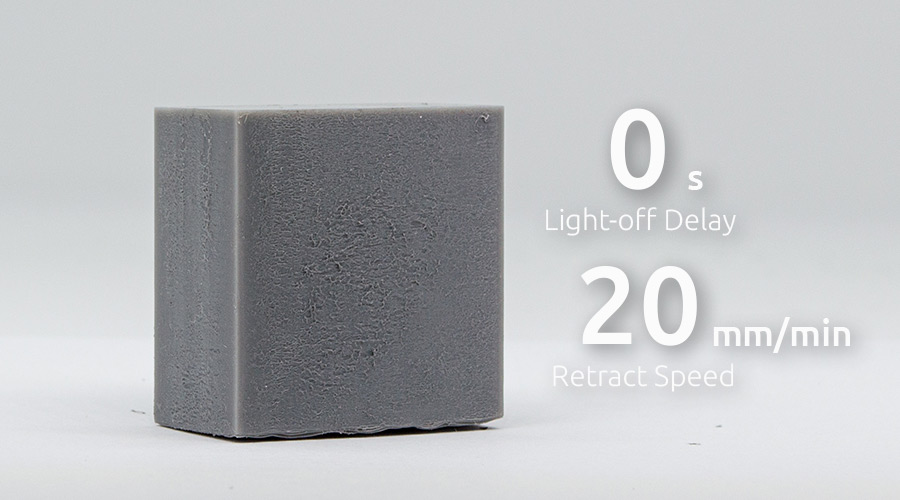
As you can probably see, a very low retract speed doesn’t help. Surface damage is still visible.
Conclusion
The experiment clearly showed that even very short light-off delay times can significantly improve the quality of 3D prints. Meanwhile, rest time after retract above 1 s seemed to be unnecessary but can be considered in some cases with large cross-sectional areas. Last but not least, reducing retract speed does not replace light-off delay and does not completely solve the “blooming” effect. Therefore, you need at least a short rest time after retract to get decent surface quality.
FAQ: Addressing Blooming in Resin 3D Printing
Q: What are some alternative methods to mitigate the blooming effect in resin 3D printing?
A: While adjusting the light-off delay is a primary method to address the blooming effect in resin 3D printing, there are alternative approaches you can consider. These include experimenting with different resin formulations, adjusting print settings such as curing time and lift speed, optimizing model orientation and support structures, and even warming up the resin before printing. Warming up the resin can make it more viscous, which may help reduce blooming by minimizing liquid turbulences during the printing process.
Q: Can temperature adjustments help in reducing blooming during resin 3D printing?
A: Yes, temperature adjustments can reduce blooming. Warming up the resin before printing can make it more viscous, which can help minimize liquid turbulences and reduce the likelihood of premature curing, thus mitigating blooming. However, it’s essential to ensure that the resin temperature remains within the recommended range to avoid adverse effects on print quality and printer components.
Q: Are there any additional post-processing techniques that can help address blooming issues?
A: Besides adjusting print settings and resin temperature, implementing post-processing techniques can further improve surface quality and reduce the visibility of blooming. Techniques such as sanding or polishing can help smooth out surface imperfections caused by blooming, resulting in a more refined final print. However, it’s essential to exercise caution and follow proper safety protocols when performing post-processing procedures to ensure satisfactory results and avoid damage to the printed object or personal injury.
Related Posts:
- Resin 3D Printing Troubleshooting: A Comprehensive Guide – Experiencing print fails? This fixes them.
- How to Prevent White Resin 3D Prints From Yellowing – Color fading? This keeps it clean.
- 9 Settings to Change for Faster Resin 3D Printing – Need a 3D printing speed boost? This helps.
- Resin Mechanical Properties – Resin acting odd? This explains why.
- Case Study: 3D Printed Linear Gear – Want smooth prints? This gear did it.
Surface troubles? Swing by our shop for resins that’ll clean things up!
