
Updated on November 12, 2020
How important are details in your 3D prints? Have you tried switching between different LCD 3D printers or 3D printing resins? If you’ve been struggling getting dimensionally accurate 3D prints using Anycubic Photon S or other LCD based resin 3D printer – this article is for you.
There are many different 3D printing applications. Creating scale models and their accessories is definitely one of them. Scale models differ from other types of bigger 3D printed products where details are not as important. Usually, they are rather small and detailed. That’s why it’s important to optimize the 3D printing process and find ways to get the most of both: the 3D printer and 3D printing resin. Sometimes to achieve this goal one has to become creative. Our client Aleksey creates scale model accessories under the brand AK3D models. He always aims at making his 3D printed parts as detailed and faultless as possible. He has put an all-out effort and found quite interesting approach to get the best of his SLA LCD based 3D printer – Anycubic Photon S.
Anycubic Photon S 3D printer
Before Anycubic launched Photon S, Aleksey has used Anycubic Photon 3D printer. He used this printer to make his 3D printed scale models and their accessories. But unfortunately, Anycubic Photon did not met Aleksey’s needs. Almost instantly, he observed that the UV light source of that resin printer is unsuitable to get small and dimensionally accurate prints, which was his aim.
“When I first started to 3D print my accessories parts for scale models, I used Anycubic Photon SLA 3D printer. I quickly noticed that the UV rays aren’t parallel to each other as well as perpendicular to the LCD screen. Luckily, Anycubic has released their updated model – Photon S.”
Although, there were people who disliked some features of the updated printer – Photon S – Aleksey was inspired by its new UV light source – “ParaLED”. “Para” stands for “Parallel” so theoretically, it should give more accurate dimensional prints and more even distribution of the UV light on the build plate. It meant he could 3D print batches of small parts on the whole build plate (which was a struggle for the original Photon). And also, achieve better quality of his 3D prints.
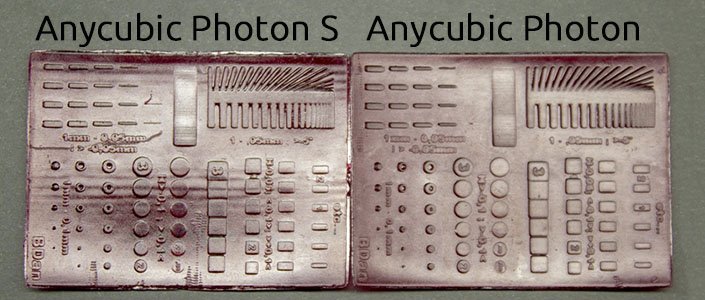
Aleksey did some comparable 3D prints on both resin 3D printers – Anycubic Photon and Anycubic photon S. He wanted to see how different quality of the prints would be. What Aleksey eventually found out was that Photon S gave better results. However, these results still seemed not as detailed as they could be.
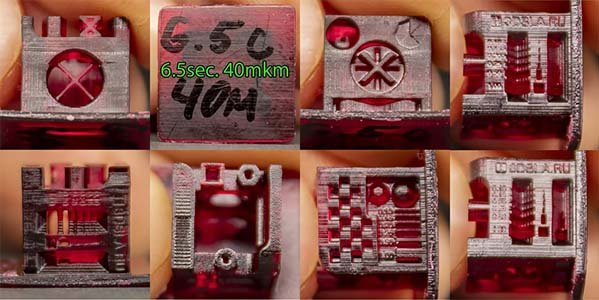
Aleksey decided to 3D print 3DSLA test cube on his Anycubic Photon S. By doing this, he wanted to compare the results he would get with the same test part printed on Kelant D200. The reason he decided to use Kelant D200 3D printer for comparison was because this 3D printer had the same Paraled UV light source and LCD resolution.
3D printing resin
After analysis of the results, Aleksey decided that the reason for different quality of 3D prints could also be the quality of 3D resin. Aleksey had tried different 3D resins throughout the period of this research. He mostly stuck to the resins that suited his needs at the given time, but never really found “the one”. He thought that there must be another 3D resin that would enable him to 3D print with the most details and precision. So, he decided to look for another brand and came across AmeraLabs AMD-3.

“I was very impressed with the speed of this resin! It is more than double the speed, compared to my previous resin! It doesn’t have any smell and washes with IPA easily. I thought, that if I could make this resin colour denser, it could solve all of my problems. I’ve contacted AmeraLabs and told them my problem. I asked if they could make a special batch of their resin with a denser coloration. And, to my surprise, they agreed!”
When Aleksey reached out to us and explained the problem, we were curious. Therefore, we agreed to make several batches of AMD-3 resin. We made several variations of black and grey.
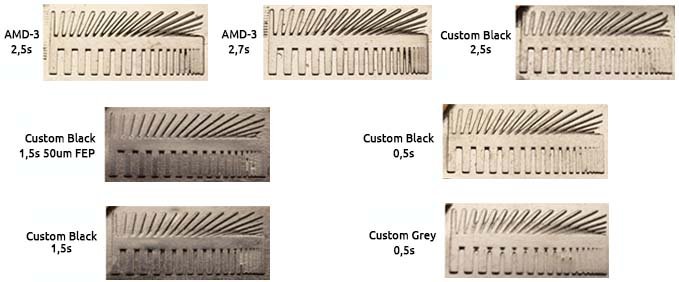
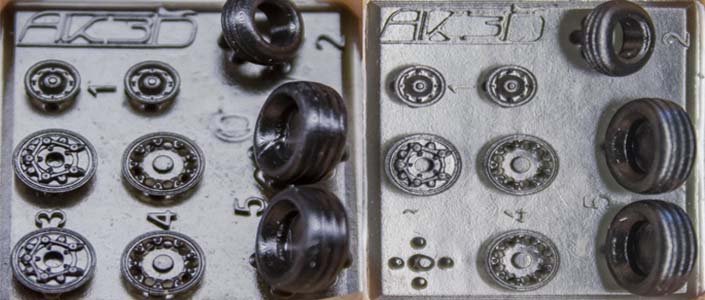
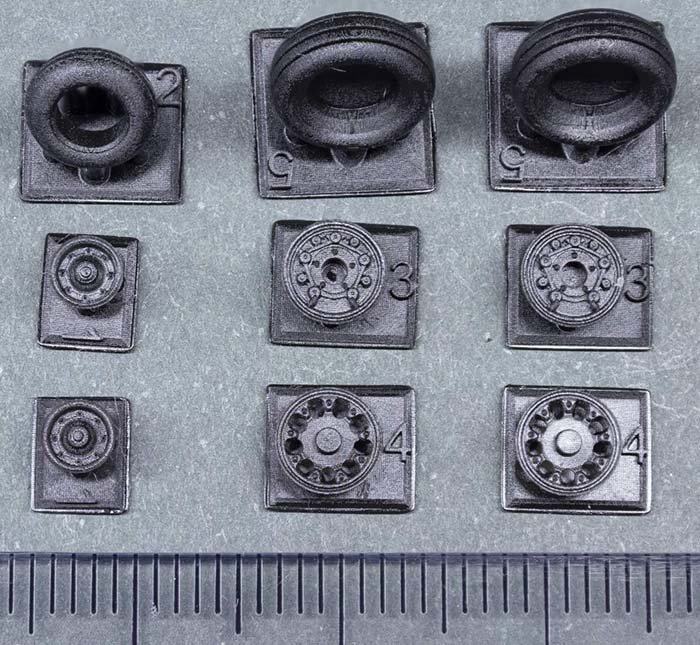
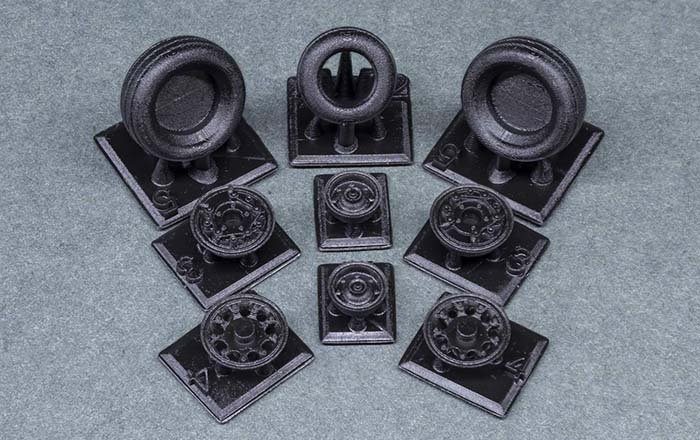
Even with the slight change in colour, Aleksey did get some amazing results. To achieve similar negative space details, Aleksey had to lower exposure time with the regular AMD-3 resin. It led to the loss of positive space details: some numbers weren’t printed and one rim was ripped from the supports. But the custom resin provided good positive as well as negative space details.
The problem for Aleksey was that 3DSLA cube still showed that he didn’t reach that desired result. He wanted to get the same results as on the test cube printed with Kelant 200.
“Even with this custom resin, tiny holes in rims were not always of the same diameter. It was a problem for me. To me it meant that I couldn’t print dimensionally accurate prints. I had to make bigger gaps in my prints to make sure that all parts would properly assemble.”
Aleksey wanted to find the reason behind this problem. He decided to look inside both 3D printers.
Differences of the 3D printers
Aleksey found information on various blogs, where people claimed they had better dimensional accuracy on the original Photon compared to a new Photon S. He decided to take apart both of his Anycubic resin printers. In this way, he could see and compare their components and find the difference. Aleksey thought that the only difference between two 3D printers would be UV light source. Unexpectedly – both printers shared the same LCD – 2560*1440 Sharp LS055R1SX04.
To look even further, Aleksey removed both LCD screens of 3D printers. To his surprise he found one huge difference – protector glass of the original Photon was 0,6 mm thick, while on the S model it was 1,2 mm. This is important because the closer UV light to the printing layer is, the less scattering of light there will be. Aleksey assumed that Anycubic decided to increase the thickness of a protector glass on a Photon S to make the screen less breakable. In the end, both printers sustained similar printing quality.
However, Aleksey thought he could completely remove the protector glass. In this way, he would get significant improvements in XY resolution on both positive and negative spaces.
We can explain this the in following way:

After the UV light gets through the LCD screen, it has to go through the glass. During this transition light gets scattered. The area of the intended cure expands. It results in less detailed form of cured resin. Aleksey removed the protector glass and got LCD closer to the FEP. In other words, he removed protector glass from UV light’s way after it goes through LCD screen. This led to a shorter distance from LCD to the resin and less distance for UV light to get scattered. Therefore, the 3D print had much greater detail.
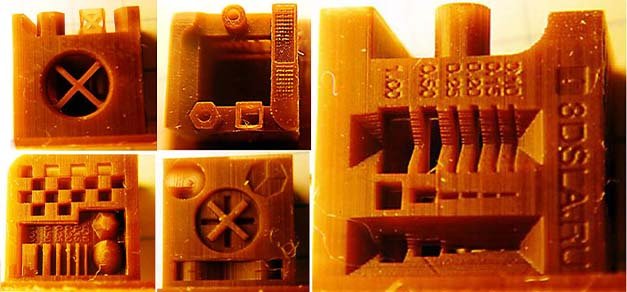
These are the results Aleksey was able to get:
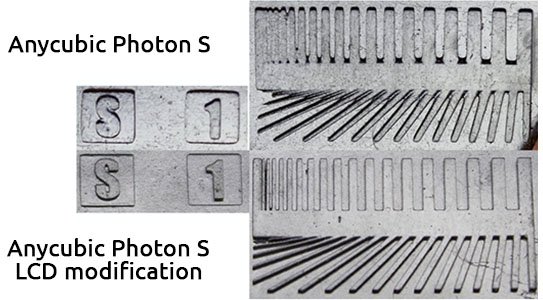
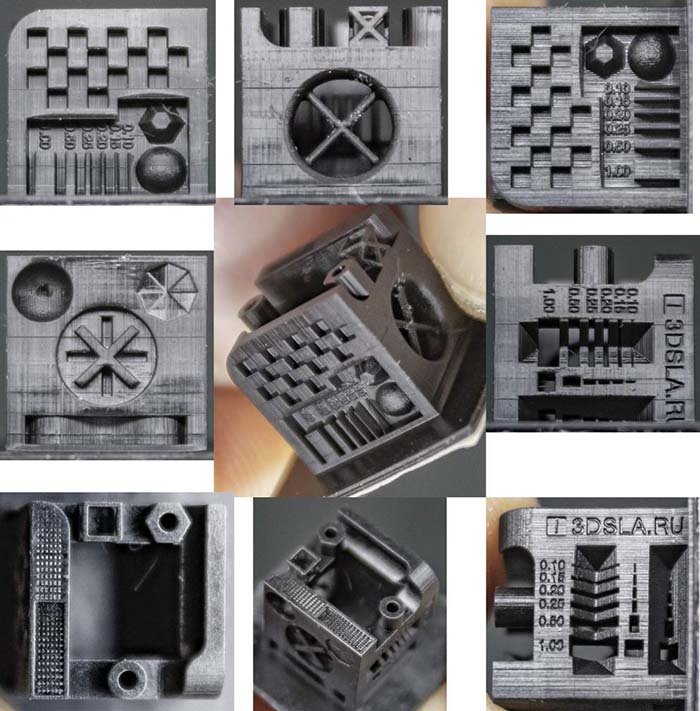
“Sharpness is almost excellent! Vertical holes printed up to 0,2 mm! Holes in cylinders at the top side of the cube are not flooded anymore! Letters on the cube are sharp and easily readable!”
Aleksey’s modification improved XY resolution on Anycubic resin 3D printer Photon S significantly and gave the ability to print at maximum of 2K resolution. However, this modification is not as easy as it may seem and does require additional knowledge, preparation and tools.
Some good news – Aleksey prepared a very detailed description of every step he took to reach these results. We recommend reading it, if you want to know more.
Disclaimer: proceed at your own risk!
Related posts
- Why should you not use default raft settings?
- How to succeed with your first 3D print
- 6 Key Principles of 3D Printing Supports that Work
- Impressive calibration part for resin 3D printers together with the guide on how to understand its features
- The Complete Resin 3D Printing Settings Guide for Beginners
- Better surfaces with Light-off delay. Blooming phenomenon
Visit our shop!
