Introduction to Rapid Prototyping with 3D Printing
Rapid prototyping with 3D printing is revolutionizing product design by drastically reducing development time, lowering costs, and accelerating innovation. Whether you’re an industrial designer, product engineer, or startup founder, mastering this approach gives you a competitive edge in today’s fast-paced market.
Unlike traditional manufacturing methods that take weeks or months, 3D printing enables the creation of detailed, functional prototypes within days or even hours. This speed allows for rapid iterations, real-world testing, and data-driven improvements, reducing the risks associated with product development.
In this guide, we’ll explore how 3D printing transforms the prototyping process. You’ll discover the best 3D printing technologies for prototyping, real-world case studies, and strategies to maximize efficiency. If you’re looking to refine your product development workflow and bring ideas to life faster, this guide is for you.
Why Should You Adopt Rapid Prototyping with 3D Printing Today?
Accelerated Production
Rapid prototyping revolutionizes product development by enabling designers to transform ideas into physical models almost instantly. Unlike traditional prototyping, which requires extensive manual labor, multiple development stages, and prolonged lead times, 3D printing streamlines the process. Within just hours, digital designs materialize into tangible prototypes, allowing teams to test, refine, and iterate at an unprecedented pace.
Time Efficiency & Faster Iterations
By eliminating time-consuming steps like tooling and machining, rapid prototyping dramatically speeds up the design cycle. With traditional manufacturing, adjusting a design might take weeks due to mold creation or CNC machining. However, 3D printing allows designers to bypass these delays, making it possible to test several variations in a fraction of the time. This increased speed means that teams can conduct more design iterations, leading to better, more innovative products without compromising deadlines.
Iterative Testing & Design Refinement
One of the biggest advantages of rapid prototyping is the ability to test and refine multiple design variations quickly. Designers can experiment with different shapes, dimensions, and functionalities, ensuring that the final product meets user needs. This iterative approach is especially beneficial for gathering real-world feedback, identifying potential flaws, and making data-driven improvements before committing to full-scale production.
Enhanced Manufacturing Preparation
Beyond design validation, prototypes also serve as a crucial bridge between concept and mass production. A well-executed prototype provides insight into manufacturability, helping engineers detect structural weaknesses, material constraints, or assembly challenges early on. By resolving these issues in the prototyping stage, companies can significantly reduce costly revisions later in the manufacturing process.
Cost Efficiency & Reduced Development Risks
Developing a product can be expensive, especially when errors go unnoticed until the manufacturing stage. Rapid prototyping minimizes financial risks by uncovering design flaws early, preventing expensive production errors and reducing waste. Furthermore, in-house 3D printing eliminates the need for outsourcing prototype production, lowering costs while accelerating development timelines.

Material Optimization & Sustainable Production
Unlike subtractive manufacturing, which carves designs out of solid blocks—wasting significant amounts of material—additive manufacturing builds prototypes layer by layer, using only the required amount of resin or filament. This precision minimizes material waste, making the prototyping process not only cost-effective but also more sustainable.
Understanding Prototyping Technologies
Choosing the right prototyping technology can make all the difference in product development. Some methods prioritize speed and cost-effectiveness, while others focus on precision and surface quality. Understanding these differences helps designers select the best approach for their specific needs.
FDM Printing: Cost-Effective and Accessible
Fused Deposition Modeling (FDM) is one of the most widely used 3D printing technologies, known for its affordability and ease of use. It works by extruding melted thermoplastic filament through a heated nozzle, building the object layer by layer.
FDM is a great choice for creating quick, functional prototypes—especially larger models where ultra-fine details are not a priority. It’s commonly used in industries like automotive, consumer goods, and education to produce jigs, fixtures, and concept models. However, its layered construction often results in visible layer lines, requiring additional post-processing like sanding or chemical smoothing for a polished finish.
Resin Printing: High Precision and Smooth Surfaces
For designers who need intricate details and smooth surfaces, resin-based 3D printing is the preferred choice. This category includes three major technologies:
- SLA (Stereolithography) – A UV laser precisely cures liquid resin, producing highly detailed prints with exceptional accuracy. SLA is widely used in aerospace, medical devices, and automotive industries for prototypes that require fine details and minimal post-processing.
- DLP (Digital Light Processing) – Instead of a laser, DLP uses a digital light projector to cure entire layers at once. This results in faster printing speeds while maintaining fine details, making it ideal for jewelry, dental applications, and consumer electronics.
- MSLA (Masked Stereolithography) – A more cost-effective alternative, MSLA uses an LCD screen to expose and cure resin. While slightly less refined than SLA, it offers faster print speeds and is a solid choice for artistic models and rapid prototypes.
Compared to FDM, resin printing excels at producing intricate designs with superior detail. However, it requires additional steps such as washing, curing, and sometimes post-processing to remove supports and refine the surface.
Other Rapid Prototyping Methods
While 3D printing is revolutionizing rapid prototyping, traditional manufacturing methods still play a crucial role in product development.
Injection Molding is the go-to process for mass production, where molten material is injected into a mold under high pressure. It allows for the creation of durable, high-quality parts with complex geometries. This method is widely used in automotive, consumer goods, and medical device manufacturing due to its precision and scalability.
CNC Machining, on the other hand, carves out parts from solid blocks using computer-controlled tools. This subtractive process offers unmatched precision and tight tolerances, making it ideal for functional prototypes that require high strength and mechanical reliability. CNC machining is commonly used for tooling, industrial prototyping, and low-volume production.
Comparison of Prototyping Methods
Each prototyping method has its own strengths, whether it’s affordability, precision, or scalability. The table below provides a quick comparison to help you choose the right approach for your needs.
| Technology | Best For | Key Advantages | Surface Finish |
|---|---|---|---|
| FDM Printing | Large, functional prototypes | Affordable, widely available | Visible layer lines, needs smoothing |
| SLA Printing | High-detail prototypes | Precise, smooth surfaces | Minimal post-processing |
| DLP Printing | Fine details, fast production | High accuracy, durable prints | Smooth, minor finishing may be needed |
| MSLA Printing | Rapid prototyping, artistic models | Cost-effective, fast | Similar to SLA but slightly less refined |
| Injection Molding | Mass production | Durable, complex geometries | Factory-finished, no post-processing |
| CNC Machining | Functional prototypes, industrial use | High precision, strong materials | Machined finish, may require polishing |
By selecting the right method based on design complexity, material needs, and production scale, designers can optimize their prototyping process for both efficiency and quality to specific project needs, such as material properties, surface finish, geometric complexity, and dimensional accuracy requirements.
Mastering Rapid Prototyping: Designing Model Files for Efficient 3D Printing
Successful 3D printing begins long before hitting the “print” button. Optimizing your digital model ensures smooth fabrication, minimizes material waste, and enhances overall print quality. By following key design principles, you can streamline the rapid prototyping process and achieve better results with every iteration.
Start with a Concept Prototype
Before refining intricate details, begin with a concept prototype. This initial print helps validate the core idea and assess its feasibility in the real world. It allows designers to identify major design flaws early and make adjustments before committing to final production.
Key Considerations for Model Design
A well-structured digital model lays the foundation for a successful print. Consider these critical factors when designing:
- Dimensional Accuracy – Ensure precise measurements to maintain consistency across different prototype iterations.
- Wall Thickness – Avoid overly thin or thick walls to balance strength and material efficiency.
- Tolerances – Factor in slight variations for moving parts to ensure proper assembly and functionality.
Optimizing for Printability for Rapid Prototyping with 3D Printing
Not all digital models are print-ready. Optimizing for manufacturability helps prevent common printing issues, reducing post-processing work. Here’s how:
- Minimize Overhangs – Steep overhangs may cause print failures or distortions. Design with self-supporting angles whenever possible.
- Strategic Support Placement – Supports are crucial, especially for overhanging elements in resin printing. Properly placed supports prevent sagging and print failures.
- Use Rafts When Necessary – In resin 3D printing, a raft improves bed adhesion, reducing the risk of print detachment (learn more in our detailed blog post).
Enhancing Efficiency
Fine-tuning model orientation and setup can drastically impact print success. Positioning models at an angle often reduces print time, improves surface quality, and minimizes material waste. Additionally, reducing support structures where possible leads to faster post-processing and material savings.
Continuous Testing and Iteration
Prototyping is an iterative process. Every version of a model should undergo real-world testing to identify flaws in functionality, durability, or aesthetics. Prompt refinements ensure the prototype meets specifications before moving to final production. For detailed guidance on optimizing models for SLA 3D printing, check out our in-depth article: “How to Design Parts for SLA 3D Printing.” This guide walks through essential design techniques to enhance precision, durability, and overall print quality.
Leveraging Rapid Prototyping for Innovation
By mastering rapid prototyping techniques, designers can significantly expedite product development. Rapid prototyping accelerates innovation, enhances flexibility, and fosters creative problem-solving. The result? High-quality, market-ready products with reduced development risks.
Troubleshooting Failed Prints
Even with careful preparation, print failures are inevitable. Instead of getting stuck, use our comprehensive troubleshooting guide: “Resin 3D Printing Troubleshooting” This resource provides step-by-step solutions for common resin print issues, helping you identify problems quickly and refine your process effectively. By continuously improving your approach to 3D model design, you can unlock the full potential of rapid prototyping and bring ideas to life faster than ever before.
Choosing the Right Material and Printing Settings for Resin-Based Rapid Prototyping
Selecting the right resin and optimizing print settings are essential for achieving high-quality, functional, and visually appealing prototypes. Each type of resin is designed to meet specific application needs, making informed material choices crucial for successful resin-based 3D printing.
Selecting the Right Resin for Your Application
Mechanical Performance
3.For prototypes that require durability and strength, resins like XVN-50 provide high elongation and superior surface hardness. These properties ensure that printed parts can withstand mechanical stress and varying environmental conditions without compromising integrity. Additionally, for projects demanding dimensional accuracy and smooth flat surfaces, our advanced modeling resin AMD-3 is an excellent choice. It excels in producing precise models with large planes, reducing warping and ensuring a professional finish. To learn more about resin mechanical properties, check out our blog post on this topic.
Transparency
Clear resins, such as TGM-7 Clear Resin, offer optical clarity, making them ideal for prototypes that require detailed internal visibility—common in medical devices, fluid flow models, or optical components. However, to achieve a perfectly clear finish, post-processing steps like polishing or applying a clear varnish are necessary.
Color Replication
For applications where precise color matching is essential, resins like TGM-7 provide consistent color reproduction. This is particularly useful in consumer product design, where maintaining brand identity without additional painting or finishing is a priority.
Surface Finish
The final appearance of a prototype can significantly impact its usability and appeal. Engineering resins come in a variety of glossy or matte finishes, catering to industries such as automotive, electronics, and architecture, where both tactile feel and visual aesthetics matter.
Optimizing Print Settings for Resin-Based Prototyping
Once the right resin is selected, fine-tuning print settings ensures the best balance between speed, accuracy, and quality. For beginners, we recommend starting with our Complete Resin 3D Printing Settings Guide for Beginners. After getting familiar with the settings, you can adjust them to match the needs of a specific print.
Understanding Layer Height
Layer height plays a crucial role in print quality and speed.
- Higher layer heights (e.g., 100–200 microns) allow for faster printing, making them suitable for early-stage prototypes where ultra-fine details are unnecessary.
- Lower layer heights (e.g., 25–50 microns) provide greater precision and smoother surfaces, ideal for intricate designs in jewelry, dental models, and precision engineering.
Exposure Time and Print Speed
- For faster prototyping, increasing layer height can speed up prints but may affect surface quality and dimensional accuracy.
- Printing multiple parts simultaneously is another way to increase the number of prototype iterations.
- For a detailed guide on optimizing speed, check out our blog post: “9 Settings to Change for Faster Resin 3D Printing.”
Achieving Dimensional Accuracy
For functional prototypes with tight tolerances, precise exposure settings are critical. Resins like XVN-50 and AMD-3 are specifically designed to minimize shrinkage and warping, ensuring parts fit and function as intended. To fine-tune exposure settings, we highly recommend using our Town Calibration Part, which helps dial in accuracy for consistent, high-quality results.

Bringing It All Together
By carefully selecting resins based on mechanical, visual, and functional requirements and optimizing print settings, resin-based 3D printing can deliver outstanding results. Whether for engineering, product design, healthcare, manufacturing, or artistic applications, mastering these elements ensures prototypes that meet both performance and aesthetic standards—accelerating product development while reducing costs and lead times.
Real-Life Examples of Rapid Prototyping with 3D Printing
Example 1: Elephant Belay Device
One of the most significant advantages of rapid prototyping is the ability to work with a wide range of materials to refine a product before full-scale production. A perfect example is the Elephant Belay Device, a critical safety tool for rope climbers.
To ensure functionality, reliability, and ease of inspection, the designer selected clear TGM-7 resin for prototyping. This material choice provided a transparent outer shell, allowing for real-time observation of internal mechanisms without having to disassemble the prototype.
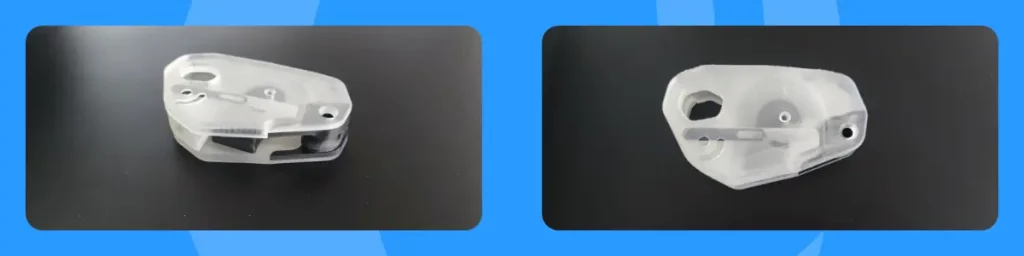
Given the high-stakes nature of climbing equipment, every component needed to function flawlessly. By leveraging transparent resin, the designer could monitor the internal locking mechanism, identify potential misalignments, and detect inefficiencies early in the design process. This iterative approach enabled swift refinements, ensuring the final device met rigorous safety standards before advancing to full-scale production.
This case demonstrates how 3D printing enables rapid iteration, reduces development time, and enhances the safety and reliability of mission-critical products.
Example 2: ESP-Flasher by Kaunas Makerspace
The ESP-Flasher project by Kaunas Makerspace vividly illustrates the substantial time and cost-saving benefits of rapid prototyping with 3D printing technology. Typically, refining shell designs for devices like the ESP-Flasher involves navigating through lengthy logistics and incurring substantial costs when outsourced to manufacturing facilities. However, by harnessing the power of rapid prototyping, the team was able to iterate rapidly and cost-effectively.
The ESP-Flasher serves a critical role in various electronic applications, particularly in programming ESP8266 and ESP32 microcontrollers. This necessitated precise adjustments to its ergonomic and functional aspects, both facilitated through rapid prototyping. Leveraging AmeraLabs XVN-50 resin for its durability and detailed resolution, the team successfully created over 140 iterations of the ESP-Flasher case. Each prototype iteration underwent quick printing and testing, enabling daily refinements in design, usability, and aesthetics.
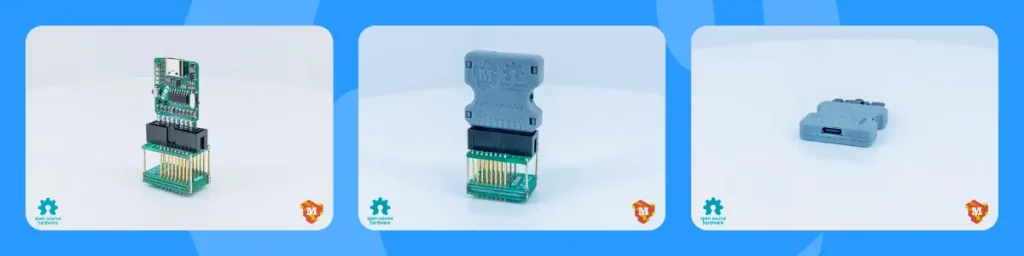
This accelerated development cycle saved considerable time and significantly reduced project expenditures, demonstrating the efficiency and cost-effectiveness of integrating rapid prototyping technologies into device development and refinement processes. The ability to swiftly iterate and validate designs has proven crucial in meeting project goals while ensuring the final product meets ergonomic, functional, and aesthetic requirements.
By using resin-based rapid prototyping, the team could quickly optimize port access, button placement, and overall usability, ensuring a seamless user experience before moving to full-scale production. This project underscores how high-resolution 3D printing enhances prototyping, making product development faster, more efficient, and more adaptable to real-world needs.
Example 3: AmeraLabs Pirate Coin
The development of the AmeraLabs Pirate Coin for the Salute 2024 Expo showcases how rapid prototyping transforms concepts into polished, functional products. The process began with a basic digital model, which served as the foundation for iterative refinements, ensuring both visual appeal and practical usability.
Using Autodesk Fusion 360, the initial design was quickly assessed for feasibility and real-world appearance. From there, the team made a series of incremental improvements, fine-tuning intricate details while optimizing structural integrity and ease of assembly. A key focus was the multi-part locking mechanism, which underwent extensive prototyping to identify the most effective and user-friendly design.
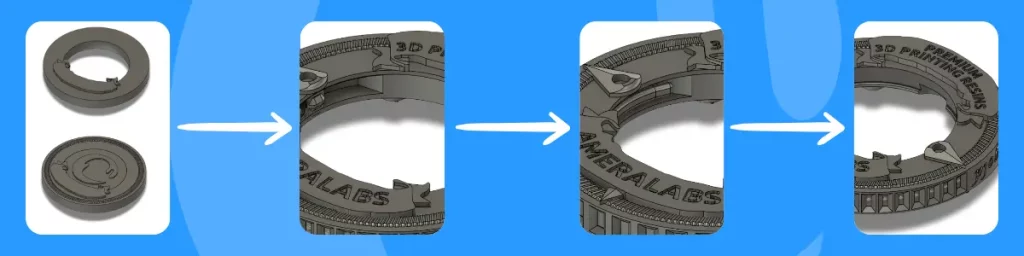
By leveraging rapid prototyping with 3D printing, the team could swiftly test modifications, eliminating the time and cost constraints associated with traditional manufacturing. This agile design process allowed for continuous iteration, ensuring the final product met both aesthetic and functional requirements.
The choice of TGM-7 resin further expanded design possibilities. Its versatility enabled the printing of inner and outer parts in different colors, offering unique customization options and enhancing the coin’s visual impact. This feature provided flexibility in color-matching and branding, making the final product even more distinctive.
Ultimately, rapid prototyping played a crucial role in refining every detail of the Pirate Coin, from intricate surface textures to seamless assembly. The result was a high-quality, expo-ready product, demonstrating how 3D printing empowers designers to iterate faster, test more efficiently, and bring ideas to life with precision.
Rapid Prototyping with 3D Printing: Conclusion
Rapid prototyping, powered by 3D printing, has revolutionized product development. It enables designers to quickly create, test, and refine physical models, turning ideas into tangible solutions with unprecedented speed and precision. This approach isn’t just about keeping up with the competition—it’s about leading the way. By embracing rapid prototyping, product teams can accelerate innovation, reduce development cycles, and deliver higher-quality products to market faster.
At AmeraLabs, we’re passionate about helping creators push the boundaries of what’s possible in 3D printing. Whether refining a prototype or launching a new product, our expertise and cutting-edge materials can help bring your vision to life.
Let’s explore how AmeraLabs can support your next project. Schedule an introductory call with one of our co-founders to discuss your goals, challenges, and how our advanced resins can optimize your workflow.
Click here to book your call today—let’s shape the future of design and manufacturing together!
Happy Printing!
Related Posts
- Case Study: SLA 3D Printed Linear Gear for Extensometer – Need a fast prototype? This gear story shows how it’s done.
- 3D Design Parts for SLA 3D Printing – Stuck on designing quick parts? This breaks it down for you.
- Resin Mechanical Properties – Not sure which resin holds up? This explains what works.
- 9 Settings to Change for Faster Resin 3D Printing – Want prototypes pronto? These tweaks speed things up.
- Resin 3D Printing Troubleshooting: A Comprehensive Guide – Prototypes failing? This gets you back on track.
Prototyping in a rush? Hit up our shop for resins that’ll keep you moving!
