TGM-7 3D printing resin is designed specifically to 3D print functional tabletop, wargaming, and gaming miniatures. Such miniatures can be used daily for tabletop gaming without fear of easy breakage. This is our guide for AmeraLabs TGM-7 3D printing resin. It covers key strategies we recommend following to avoid failures and get the best results. For those with other resins, we recommend starting with The Complete Resin 3D Printing Settings Guide for Beginners.
Our TGM-7 3D printing resin works excellently with both MSLA and DLP 3D printers. MSLA means LCD-based 3D printers like Phrozen Sonic Mini 8K, Anycubic Photon M5, Elegoo Mars, Peopoly Phenom, or Zortrax Inkspire. These printers use an LCD screen as a mask with an underlying LED light source to project layers on the bottom of resin VAT with FEP film. In contrast, DLP 3D printers use a DLP projector instead of an LCD screen. Anycubic Photon Ultra, Anycubic Photon D2, Elegoo Mars 4 DLP, and Asiga are DLP printers.
However, TGM-7 3D printing resin is not compatible with laser-based 3D printers like Formlabs or Peopoly Moai, which use VAT trays with PDMS silicone lining.
Due to its inherent toughness and flexibility, some specific 3D printing strategies should be followed when printing with TGM-7 resin. Below we present you with a list of key instructions we recommend following to avoid common failures. Remember, these are just specific instructions for TGM-7 3D printing resin. Consequently, you should also continually apply all fundamental SLA 3D printing techniques.
Choosing the right color resin for your project
Across all TGM-7 color variants, except for clear resin, users can enjoy the convenience of consistent printing settings, ensuring a seamless printing experience. Whether opting for white, grey, yellow, red, or blue, the printing parameters remain uniform, streamlining the printing process and eliminating the need for constant adjustments. However, it’s important to note that the clear variant, due to its transparency properties, requires specific printing settings different from the colored resins.
For those looking to enhance their tabletop gaming experience, the choice of resin color can offer additional benefits. Opting for grey resin is advisable for miniatures intended for painting, as the neutral tone serves as an excellent base for applying intricate details and vibrant colors. On the other hand, white TGM-7 3D printing resin is ideal for crafting snow-white models, making it perfect for printing bones or skeletons to complement your tabletop setup. Other TGM-7 colors can provide a fresh boost of vivid hues for a truly unique tabletop experience.
TGM-7 resin colors uphold the same durability and precision as the entire TGM-7 lineup. They are engineered to craft resilient miniatures capable of enduring even the most intense gaming battles while showcasing every intricate detail.
Moreover, TGM-7 tabletop 3D printing resin colors can be blended together, opening up creative possibilities. Experimenting with different color combinations, excluding clear TGM-7, does not impact printing quality, and the same settings can be applied seamlessly to both standalone colors and blended variants. This flexibility allows users to unleash their creativity without constraints, adding depth and personality to their 3D printed creations.
Use the attachment layer and make it thin
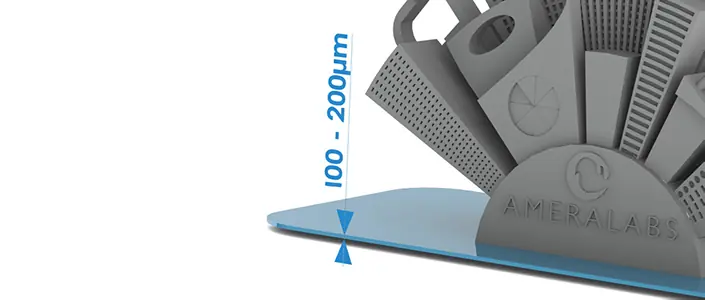
As we emphasize and explain in our blog post, we suggest using a thinner attachment layer for SLA 3D printing. For TGM-7 3D printing resin, we recommend keeping the thickness of the raft equal to 2-4 normal layers. So, if you plan to print at 50um, go ahead and make the thickness of the raft 100-200um. TGM-7 3D printing resin is strong and non-brittle, so there should be no difficulties removing the attachment layer together with the object from the build plate.
Use appropriate cure times for initial layers
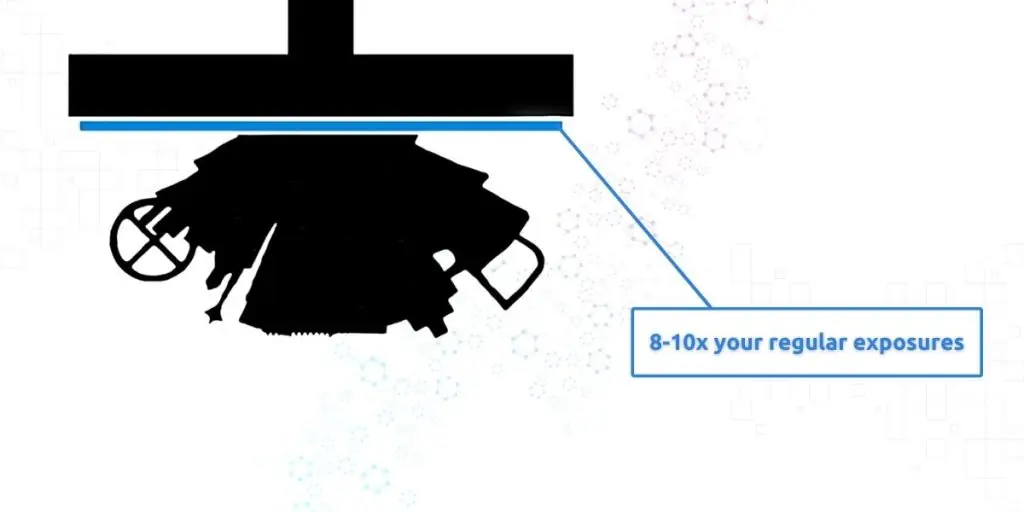
TGM-7 3D printing resin exhibits very good adhesion to standard steel or aluminum build plates. Use 8-10x your regular exposures for initial/raft layers. For those using 1-2 seconds for normal layer exposure, we recommend employing 15-25 seconds for bottom exposure. When adjusting bottom exposure settings for TGM-7 3D printing resin, print the AmeraLabs Town calibration part and tune the exposure time accordingly. Decrease the exposure time if the resin sticks excessively and is challenging to remove. Conversely, if it fails to adhere to the build plate, increase the exposure time.
Sometimes too long exposures on printers with monochrome LCDs and very powerful light sources can result in severe adherence to the FEP film of your VAT. So judge settings based on the results you get.
Avoid large overhangs by all means
TGM-7 3D printing resin is quite flexible. However, the material’s flexibility raises one key point that must be considered: avoid large, flat overhangs with high cross-sectional areas even if they are well supported.
Such large layer area overhangs tend to cause issues when the very first layer is cured. It gets separated from FEP film, and as it is very thin (around 50um or 100um), it is also very flimsy and flexible. It results in waves and unevenness, making it difficult for the next layer to adhere, especially if it is also large and flat. To better understand this, see the image below.

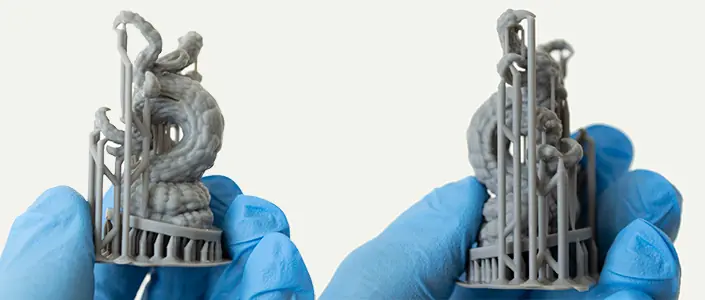
Addressing this issue is typically not overly challenging. Our suggestion is to adjust the orientation of your object slightly. Such a minor alteration has the potential to profoundly affect the arrangement of the cross-sectional area across all layers of the object. Even a slight adjustment in orientation (10-15 degrees) can yield a considerable difference. Additionally, addressing large overhangs further entails the placement of dense, thin supports with support tips measuring 0.15-0.20 mm.
Likewise, such intricate changes of angle do not dramatically alter the overall supporting strategy of your object. Below are a couple of examples.
Always hollow your objects and place drainage holes properly
Hollowing is a very important technique in SLA 3D printing. This not only helps to save material but also makes newly-cured layer separation from FEP film way easier.
We recommend using a wall thickness of 1.5-2mm.
Also, remember to position your vent holes of hollowed objects properly and carefully. This critically important point applies not only when using TGM-7 3D printing resin.
Vent holes (also called drainage holes) have to be placed in a way that allows all isopropyl alcohol (that is trapped inside) to run out during cleaning. There are positions of vent holes that are inherently wrong.
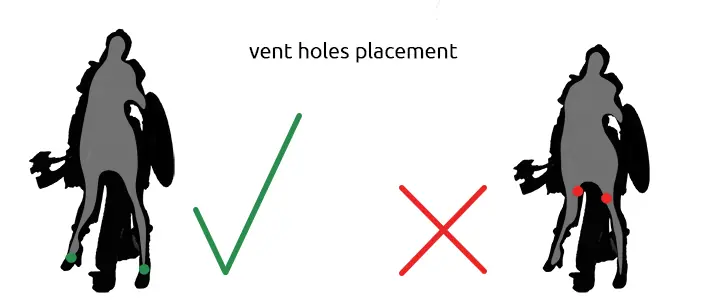
By placing vent holes in positions marked red, you risk trapping IPA in the model. Especially if you do not rotate it very thoroughly during the cleaning. But even active rotation might not help to get all IPA out. If you leave trapped IPA inside the model for prolonged periods, it will affect a 3D printed object. Trapped IPA will eventually alter the final polymer and will cause significant damage to your 3D prints, like fractures, warping, and loss of dimensions. IPA is a solvent, and it can have a significant impact on final properties when exposed for prolonged periods of time. We talk about this impact in our article: Can cleaning SLA prints with IPA cause cracks on my models?
However, by placing vent holes in the locations marked green, you create a natural way for IPA to exit the model. This avoids trapping it inside and causing significant damage to the 3D-printed model’s structure.
It is critical to get all isopropyl alcohol (IPA) out of the model. Only then can you expect long-lasting and sustainable performance not only with TGM-7 3D printing resin but also with all 3D printing resins.
Apply the correct strategy of supports for TGM-7 printing resin
As always, the importance of proper support strategy is significant. Incorrect support parameters can lead to constant failures and frustration. But no worries! We have some key recommendations to ease this stress for you!
Due to the inherent flexibility of TGM-7 3D printing resin, we recommend implementing the following aspects into your support strategy when printing with it:
Support strategy for miniatures:
- Add a couple of anchoring supports with 0.5-0.6mm tips and 1.5mm wide support struts.
- Most supports should be medium size, with 0.25-0.3mm tips and 1.5mm wide support struts.
- Add many supports with 0.15-0.2 tips and 1.5mm wide support struts.
Ensure to place supports on overhangs and islands, and remember to include supports for stability.
For heavier, big, solid prints – use higher density and thicker tips.

You can adjust and push the limits of these settings after you get more experience with TGM-7 3D printing resin. We always recommend more conservative settings in order to get decent success at the beginning.
Slicer support configuration files for TGM-7 3d printing resin
These profiles have three support modes, and we suggest using them based on your specific 3D-printed object and intended results.
Medium supports. This profile is our go-to profile for a start. It has balanced support tip thickness and works well for experienced users as well as beginners. We highly recommend always having pliers to ease the stress of support removal.
Light supports. This is the profile with the thinnest tips. Support removal is easy, but it requires way more planning and optimized orientation that produces the lowest possible cross-sectional area of layers. It is best for small objects, although we have seen people print quite big ones as well. We highly recommend this profile only when you become familiar with TGM-7 and have a decent success rate already.
Heavy supports. This profile has thicker support tips than other configurations. It is a good option for larger objects with a higher cross-sectional area. Thicker support tips help to preserve correct geometries and withstand forces of separation from FEP or PDMS during 3D printing. It is more forgiving of mistakes but also a bit more difficult to remove them.
The recommended density for all profiles ranges from 70% to 95%. Make manual adjustments if needed. We suggest adjusting density based on your needs, as sometimes the number of supports generated for some objects is too high.
Download TGM-7 support profiles:
Chitubox support profile for TGM-7
Lychee support profile for TGM-7
Exposure times for TGM-7 3D printing resin
For exposure times when printing with TGM-7, refer to our recommended 3D printing settings page. Use the AmeraLabs Town 3D printing resin calibration part to fine-tune the settings.
Optimal resin temperature for printing
To ensure the best outcomes with TGM-7 resin, it’s advised to sustain a temperature of around 25°C or 77°F during the printing process. Instances of printing failures tend to become more frequent when temperatures dip below 20°C or 68°F.
If you own a resin heater, now is the time to use it for optimal results. However, we recommend avoiding resin heaters that blow warm air directly into the vat, as this can disturb the resin and increase the chance of failure.
Other methods for achieving optimal printing temperatures would be warming up the resin in the bottle, adjusting the heating for the print room, or simply moving your resin 3D printer to a warmer room.
Cleaning recommendations for TGM-7 3D printing resin
AmeraLabs TGM-7 material has a bit higher viscosity than most 3D printing resins. However, it does not make cleaning printed parts with isopropyl alcohol (IPA) more difficult.
Do not leave TGM-7 3D printing resin submerged in solvents for extended periods of time. Do not leave objects submerged in IPA or any other liquid for more than 40 minutes. Doing so might ruin your models and affect the final properties of the polymer material.
If you use Anycubic Wash and Cure, leave the printed object submerged in IPA for 12 minutes. Depending on the results, you can repeat this step and leave it for an additional 6 minutes.
Resin manufacturer’s tip: remove supports before cleaning. This way, the IPA will stay clean longer.
If you prefer to clean with ordinary IPA baths, here is our easy four steps cleaning procedure:
- After taking your printed object off the build plate, submerge it in the IPA bath for 10 minutes.
- Swirl the IPA bath with the printed object actively for another 1 minute.
- After swirling, leave it fully submerged for another 10 minutes. At this point, it would be wise to change the IPA to a clean one.
- Finally, swirl the bath actively again for 1 minute.
Evaluate cleaning results and repeat this procedure only once (if needed).
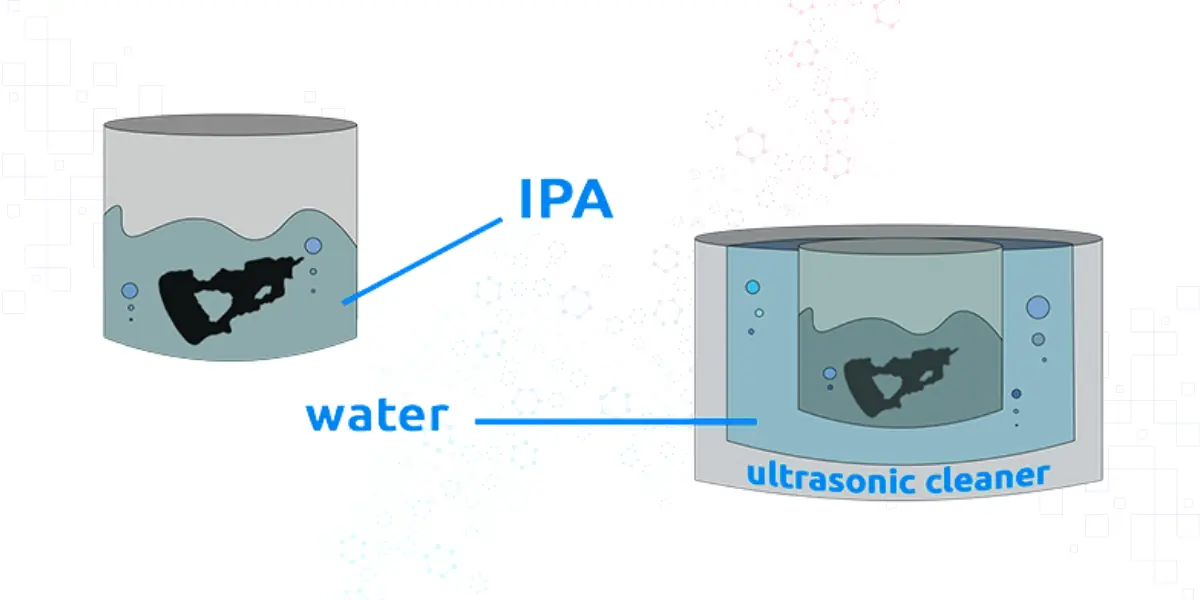
For those with an ultrasonic cleaner, we recommend putting the printed object into the container with IPA, closing it well, and putting that container into the ultrasonic cleaner filled with water. Let it sit in an ultrasonic cleaner for no more than 10 minutes without additional heating.
Resin manufacturer’s tip: We learned that following our four-step washing procedure for intricate cavities tends to produce better results than short ultrasonic cleaning.
Drying cleaned resin prints in different conditions
There are two main approaches to drying 3D printed models after washing. The first, simpler method involves allowing the print to air dry until the isopropyl alcohol (IPA) evaporates, leaving the surface dry. Alternatively, you can use additional methods, such as compressed air or an air circulation chamber, to expedite the drying process. To provide some insights, we conducted an experiment using the Ameralabs Town calibration part. One part was left to dry naturally in open air (23.7°C and 27.3% RH), while the other was placed in an air circulation chamber to observe the accelerated drying rate.
The part left in the air circulation chamber was ready for post-curing in 10 minutes, while the part left in the open was dry in 20 minutes. Please note that the drying process and time required might vary from print to print. For the fastest drying process, we recommend using compressed air, which removes leftover IPA from nooks and crannies like a breeze.
Resin manufacturer’s tip: Avoid leaving uncured prints to dry for extended periods. Allowing uncured prints to sit for prolonged times exposes them to environmental factors such as humidity and temperature fluctuations. Additionally, TGM-7 resin has the tendency to absorb moisture from the surroundings, potentially compromising the quality of your prints. It’s advisable to always post-cure immediately after drying to maintain optimal print quality.
Post-cure immediately after cleaning and drying
Right after 3D printing, TGM-7 3D material actually tends to be softer than most other resins. Post-curing it in a UV chamber is mandatory to complete the curing process. If you haven’t already removed the supports before the cleaning procedure, we recommend doing it now. As the material is non-brittle, in specific cases where dimensional accuracy is needed, you can also post-cure with supports and remove them later. Be aware that removing supports after post-curing might leave more noticeable support marks.
We recommend to post-cure TGM-7 printed parts for at least 15 minutes – 1 hour (50W of 395-405nm LEDs). It is very important to post-cure parts immediately when they are dry after cleaning, i.e., long storage of raw, not post-cured parts is highly not recommended.
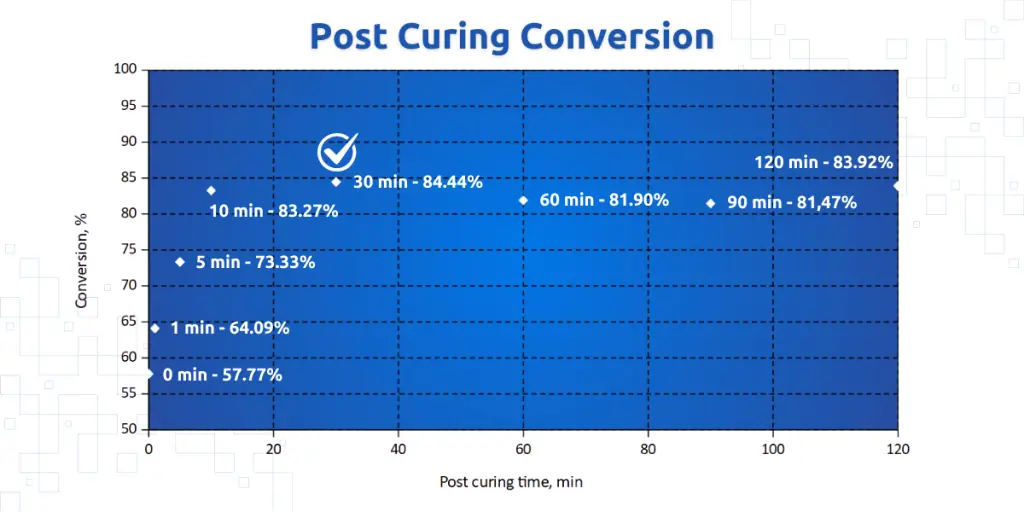
In resin 3D printing, post-curing often revolves around the concept of conversion rate. Initially, printed objects are made of partially cured resin, lacking the desired strength and durability. However, exposure to UV light during post-curing initiates a crucial transformation. The conversion rate measures the effectiveness of this process, indicating the percentage of resin that has undergone polymerization. A higher conversion rate signifies a greater degree of resin transformation.
To find the optimal post-curing time, we tested how different times affect conversion rates. We cured eight small parts printed with TGM-7 for different periods of time in a 50W curing station. Our experiment concluded that the highest conversion was achieved by post-curing the part for 30 minutes. Be mindful that results depend on the type of UV light used, the dimensions and shape of the model, and other factors. Adjust your post-curing times accordingly.
After the proper post-curing surface of the TGM-7 printed object is completely non-sticky and difficult to scratch.
Mixing the colors of TGM-7 3D printing resin
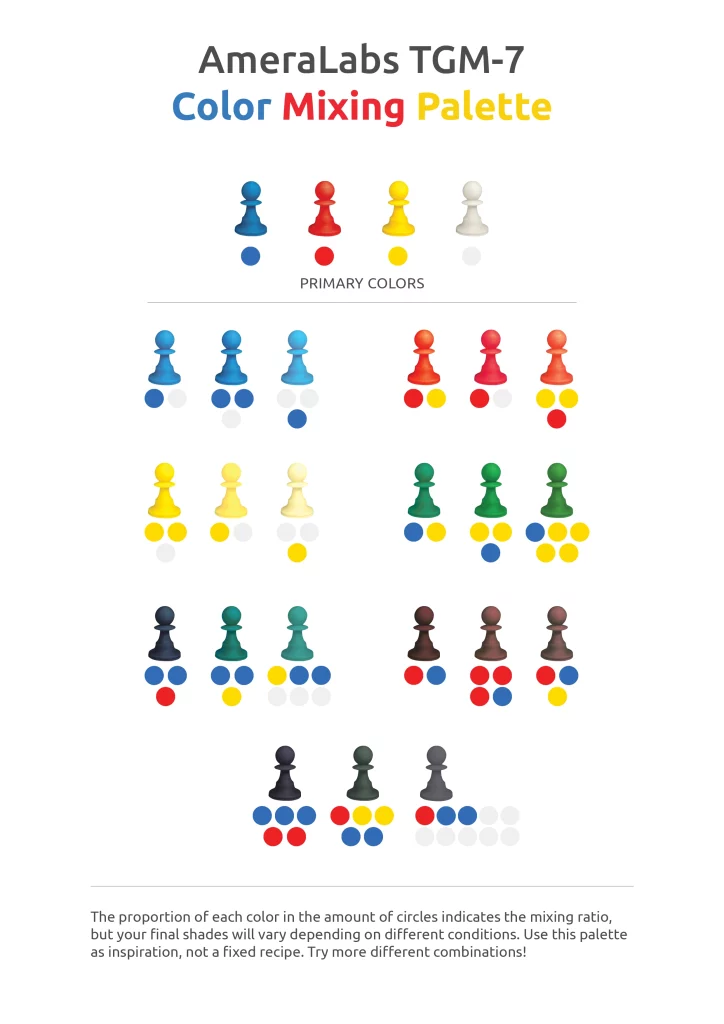
Blend classic TGM-7 colors with vibrant new shades to infuse your prints with a burst of color. Incorporate colored details directly into your designs, minimizing the need for extensive painting with these dynamic hues. Explore the art of color mixing and unleash your creativity by combining various colors. Whether blending red, yellow, blue, or white TGM-7 resins, maintain consistency by utilizing identical printing settings across the board.
Refer to the color mixing palette below as a guide to blending TGM-7 3D printing resin colors. The proportion of each color represented by the circles indicates the mixing ratio, although your final shades may vary depending on different factors. Consider this palette as a source of inspiration rather than a rigid recipe. Experiment with diverse combinations to discover unique blends, and don’t hesitate to share your results with us and the broader printing community, fostering a culture of creativity and innovation.
Coating
You can coat your TGM-7 prints with a primer for further painting. We have successfully tested Citadel Chaos Black and Citadel Corax White.
Troubleshooting problems
Resin Interaction with Vat Paint
Some resins can react with low-quality paint used on your resin vat, causing the paint to thin out. This reaction is nothing to be overly concerned about; it’s just chemistry at work.
If you notice this happening:
- Preparation: Clean and dry the vat thoroughly before proceeding.
- Sanding: Use fine-grit sandpaper to lightly sand the interior of the vat where the paint has deteriorated. Sanding removes the damaged paint layer and prepares the surface for future use.
- Clean Up: Once sanded, clean the vat again to ensure no paint or resin particles remain, which could contaminate your prints.
This approach is a tried-and-true method to maintain the integrity of your prints. We’ve used this technique ourselves with positive results, ensuring that even after paint thinning, your vat remains functional for high-quality printing.
Other recommendations
Please also be aware of several recommendations and warnings that relate to TGM-7 3D printing resin:
- The properties of cured objects made with this material can vary if they are exposed to extreme conditions such as high humidity, extremely dry air, and high temperatures (>60C) for prolonged periods of time.
- Objects, 3D printed with TGM-7 material, should not be used for models and parts that will constantly be in contact with water, organic solvents, etc.
- DO NOT leave this material inside the resin tray inside your 3D printer for prolonged periods. We learned that even with most 3D printing resins, such long storage without air circulation can deteriorate coatings. This could happen when the coatings used for 3D printers are not resistant to chemicals enough.
Start your TGM-7 printing journey armed with all the essential knowledge. Should you have any inquiries, feel free to reach out to us via email or Facebook. Additionally, explore our Troubleshooting Guide for solutions to prevalent printing issues. Ready to dive in? Visit our shop today to get your hands on TGM-7 resin!
